Ice Lanterns
I read about making ice lanterns on one of my favorite blogs, Ordinary Life Magic, and just had to try it. Stephanie is brilliant and you should read her tutorial if you want to do this. Thanks for the inspiration, Stephanie!
Trouble is, where we live in California, we don’t have snow or freezing temps. But we do have …. (drumroll) …. freezer technology!
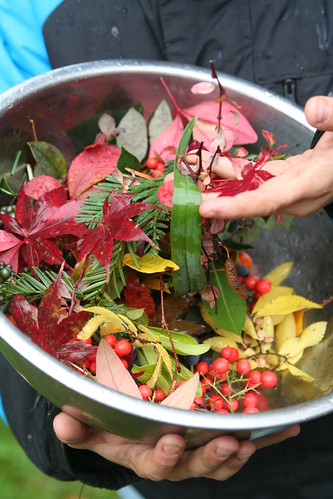
Lucas helped me clip and gather lots of little bits from our garden, which these days is looking a lot soggier, muddier, and more cluttered with decaying leaves than usual. Still, there are plenty of colorful bits and bobs to find: autumn leaves, berries, sprigs from our redwood trees, and even a few stubborn flowers still.
Fortunately, Ian hadn’t yet succeeded in his bid to get rid of the old and mismatched food storage containers, so I was able to use them. We had to find rocks to weigh down the inner container. This is when my kids lost interest, so I carried on bravely without them.
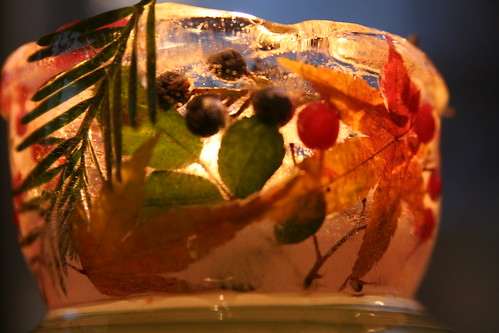
First, I froze an inch of water in my large, cylindrical container to make a base of the lantern. Then I set the smaller, weighted cylindrical container inside the bigger one. I put the nature bits and bobs into the space between the inner and outer containers, then poured water into the space and set the whole thing carefully on a level shelf in the freezer. I tested the ice after a few hours and decided it wouldn’t really be done until the morning.
The next day, we carefully transported the whole thing, containers and all—frozen solid—to brunch the next morning at our friends’ house. It was the hostess’s birthday and she is, and always has been, a candle nut, so we presented our ice lantern to her as a gift, with a gaily burning tea light inside it. It turned out beautiful!

Some things I learned in doing this:
* Ice expands when it freezes (of course) and may make your outer container bulge if it’s plastic, so don’t use something you wouldn’t want to be ruined. (A coffee can might work best.)
* Don’t use glass; I used a glass jar as my inner container of one of my lanterns and it broke before it released from the ice.
* You can easily remove your inner container by pouring in some warm water. Just make sure you haven’t accidentally spilled water into the inner container before freezing, for of course, that will freeze too and make it difficult to pull out the inner container.
* If your ice lantern breaks into two pieces like mine did, you can put it back into the freezer (still protected within the outer container) and the broken parts will freeze together again.
* If you put your ice lantern on a plate or flat surface to display it indoors, it will probably slide around as it melts. I improvised a solution by putting down a paper towel first, setting the lantern atop it, and then disguising the towel with autumn leaves. If you have snow, you can put your lantern on a pile of snow, or I suppose sand would work to keep it centered, too, and would be naturally pretty.


December 2, 2010 at 4:30 am
Beautiful!!
I didn’t have any break or bulge, though I really thought I would! I meant to say that– “Don’t use any bowls you inherited from Aunt Sophie!!” 🙂
Do coffee cans still have the lip on the edge? That would make for frustration getting it out of the can- you’d have to melt enough to get it small enough to squeeze through that.
I was actually thinking “table”, too, though ours are still all outside at the moment.
I think for the next ones I’m going to use a square orange juice container (I’ll just cut off the top.)
So fun. And soooo pretty!
And thanks for the link love, too! 🙂
December 2, 2010 at 4:32 am
ps – where yours broke in two… was that the bottom? The two layers? That’s what I”m worried about, if ice freezes in two parts, it breaks easy.
December 2, 2010 at 10:46 am
Hi Stephanie! Thanks for reading! You know, I don’t know about coffee cans and whether they have a lip; I don’t buy coffee in cans. But I still think of them as the totally useful all-purpose objects. Perhaps the milk carton or orange juice carton would be best, since it would be flexible and recyclable. Or maybe an oatmeal cylinder?
When my lantern broke, it actually cracked up the side, not where the “old” ice base joined the “new” ice sides. I figured it was because I heated the container with warm water to extract the lantern. Perhaps the cold and heat combined caused the cracking? Nevertheless, it fused back together nicely.
I love checking in on your blog. Such a lot of love and fun there! Thanks for writing!
December 2, 2010 at 11:42 am
Super cool! Kudos to you and Stephanie. These are excellent. Winter comes to CA!
December 3, 2010 at 12:50 pm
Thank you, Richard! I’m a huge fan of your work and I really appreciate your comment!
December 8, 2010 at 4:36 pm
WOWZERS – those are gorgeous! I’ll have to add some pretty embellishments to mine. Thanks for stopping by my blog (-:
December 9, 2010 at 10:32 am
My pleasure! Thank you, Selina!
December 12, 2010 at 3:37 pm
Thanks for such clear directions, as soon as it gets cold this winter (yeah it’s still in the fifties in Colorado) this going on our project list.
December 21, 2010 at 5:19 pm
Now I wish I had a bunch of red leaves from the fall cached away. I’m sure there’s more out there than I realize though. I noticed some bright red berries in the woods today…Thanks a bunch for the inspiration!
December 28, 2010 at 10:14 am
Hi Cindy, thanks for popping by. Evergreens or berries look great in the ice lanters, as do dry grasses or seed pods. I bet even Christmas ribbon scraps would look pretty. Have fun!
I’m eyeing your best snacks of 2010 roundup and thinking I might tackle some of those. Thanks.
December 8, 2011 at 6:12 pm
These are beautiful! I love the way that they came out, and I am going to try this tutorial as well. Fun to see the many ways that you can create these.
October 10, 2013 at 7:05 pm
Thanks for this hotel review. It can be difficult to choose a place to stay when you haven’t been to the area before.