Mermaid Aquarium Tutorial
Have you ever wished that a mermaid would visit your home and be your best friend? You might get your wish, if you set up the perfect place for her to stay: a mermaid aquarium in your home or school! This is a simple project that older children can create by themselves or with a little help from you, and which may truly enchant younger children. While you’re assembling your mermaid aquarium, dream up some stories that feature your mermaid friend. With your mermaid visitor beside your child’s bed, tell mermaid bedtime stories.
Materials
- beeswax (color choice is up to you; I used blue, green and flesh colors for my mermaid)
- wool roving (any color you like works for mermaid hair)
- fishing line or thread
- straight sewing pins
- a large, clear-glass vase (a gold-fish bowl or small aquarium would also work very well)
- seashells
- found beach glass, beach pebbles, or glass gems from the craft store
- a plastic aquarium plant (if your container is very large, you might want two of these)
- water
Begin by gathering your materials together. This is a nice project to do outdoors, especially since you may spill some water, so craft outside and enjoy the fresh air. If you don’t have a plastic aquarium plant or would rather use a natural material, you can wet-felt or needle-felt some seaweed out of wool. There are many kinds of seaweed, so any shape of plant will do nicely.

Model Your Mermaid
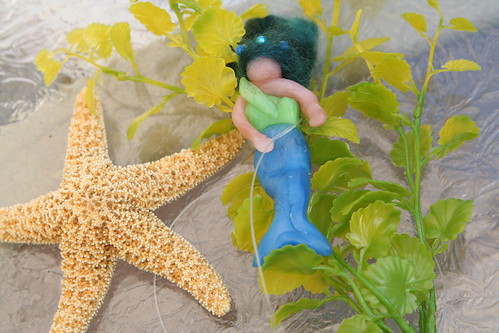
Your first task is to fashion your mermaid out of beeswax. Mermaids (and mermen) come in many different colors. Your child may have an idea of how this mermaid should look. If the beeswax is hard to mold, consider dipping it in warm water for a few minutes, or let the heat from your hands and breath soften it. Younger children find this very helpful when working with beeswax. Start by making the mermaid’s tail first, then create the mermaid’s upper body and arms. Finally, add on her head, making sure to let the wax from the body join the wax of the head. Your mermaid probably looks funny at this point. Mermaids are known for their gorgeous hair, right?
Use a shock of wool roving of any color you like and arrange it on your mermaid’s head to look like her luxurious locks. (You might want to do this next part out of the sight of younger children.) Now carefully take a few sewing straight pins and pin the wool hair to the mermaid’s head by aiming the pin down through her head and into her upper body. If you are careful, you can arrange the pins so that they look like hair decorations or a crown. Since children may be handling the mermaid, make sure the pins don’t stick out from her body to poke someone. Fortunately, if a pin’s tip emerges, you can just back it out and try again. The beeswax easily “heals” if you rub out the hole. Perhaps the children would like to give the mermaid a name now.

Assemble the Mermaid Aquarium
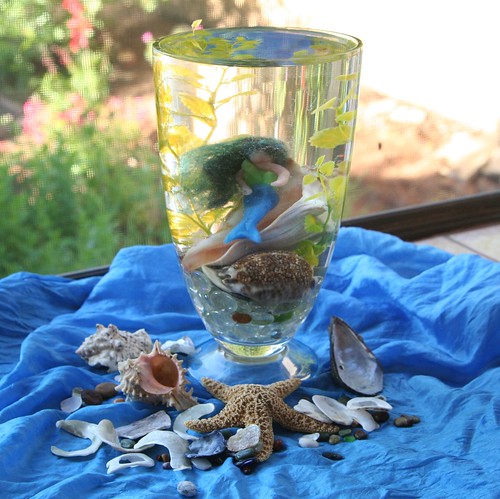
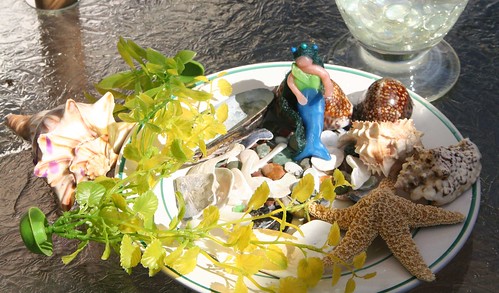
Now that your lovely mermaid is done, you can begin to assemble her underwater home. Fill the glass jar about a third of the way full with beach glass, pebbles, or glass gems. Your child may already have such treasures in his or her special collection, and may wish to contribute to the mermaid’s home. Consider adding seashells you have gathered from the shore (after you rinse them well). Real seashells will help your mermaid friend feel at home. Even the youngest children can easily add these special items to your vase.
Be Thankful
Talk about where these treasures from the sea came from. Thank Mama Ocean for being the home to such amazing shelled creatures, and for wearing down the pebbles until they are smooth as silk. Sing a mermaid song.
Your aquarium is beginning to look inviting, isn‘t it?
The Tricky Part: Beeswax Floats
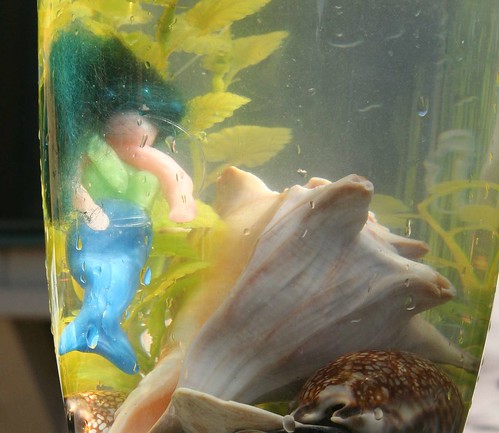
Now comes the only challenging part. Your beeswax mermaid at first wants to float on top of the water, but we know she will be more at home under the water. Take a small length of fishing line or thread and gently tie your mermaid to your plastic aquarium plant, or to a heavy seashell. We tried doing both, and found we were happiest with how she looked when anchored to the heavy shell. If you tie your mermaid to the plant, now is the time to plant the base of the plant into your pebbles or gems so that the plant looks like it’s growing there at the base of the aquarium. If you opt to tie your mermaid to a heavy shell, place your plant first, then add the shell and mermaid to the aquarium last. You probably won’t be able to see the fishing line or thread.
In thes photo above, it looks like our mermaid is swimming. In the next photo, she is resting atop a seashell. Feel free to move the objects around until you achieve a scene that you like.

Enjoy Your Mermaid Visitor
Now place your mermaid aquarium on your summer nature table or at a child’s bedside. Arrange other beach treasures around her on an ocean-like silk. It will help her feel at home! If you tell a few mermaid stories, your child may become enchanted by the mermaid guest and may whisper secrets to her during the long twilight of summer evenings.
Perhaps the mermaid will tell the children stories of her life in the sea, the beautiful underwater merfolk cities, her fish friends, and water magic. Perhaps, if you‘re very lucky, the children will tell you these stories, too.
Please note: Your child may wish to touch the water and play with the mermaid, so your placement of the mermaid’s aquarium home may depend on whether spills are a problem. Also, if your mermaid visits for a long time, you may need to change the water to keep it looking clear. In doing so, you may need rinse the gems, pebbles, and shells. But then, you and the children get to remake it all over again!


August 1, 2012 at 2:21 pm
I was inspired by your leprechaun ring earlier this year and made my own, which we all loved. Feeling like I needed a little boost this afternoon, I searched for your blog again and found this. How lovely! Just wanted to let you know you are inspiring people out there-even if they don’t always take the time to comment. Thanks from Keene, NH 🙂
September 1, 2012 at 10:25 am
Nora, that’s so awesome to hear. THANK YOU for saying that. I’ll keep on creating and writing. We have a new Autumn Equinox and Michaelmas e-book that just released. It has some great crafts in it. Must make a button!