Christmas Projects: Gift Tags

Although I used to go all out when wrapping gifts, in recent years I’ve become … let’s say …  somewhat busier and lacking time for such frippery. In fact, lately, my answer to labeling packages at Christmas has been simply to pull out my black or red Sharpie and scribble directly onto the wrapping paper. Frankly, it kills me to spend money on this stuff.

I’m still lacking time, but this week I had a sick boy home for two days with a fever, and whenever that happens he begs me to come up with things for him to do to pass the time at home while I’m working.

So, we made some simple gift tags from recycled (repurposed?) paper. Not fancy. Not fine. But fun, useful, and it couldn’t be easier.

Gift Tags Project: Repurposed Grocery Bag Gift Tags Project: Repurposed Grocery Bag

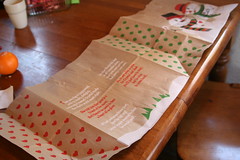
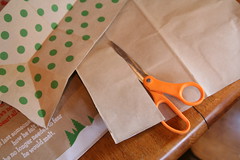
Yep. It’s a paper grocery sack, cut roughly into squares and stamped with my two Christmas stamps. My mother-in-law gave me the snowman when she retired from teaching third grade. The tree stamp is one we bought to make gifts about five years ago. I love it when we can do a project without buying anything new.

Gift Tags Project

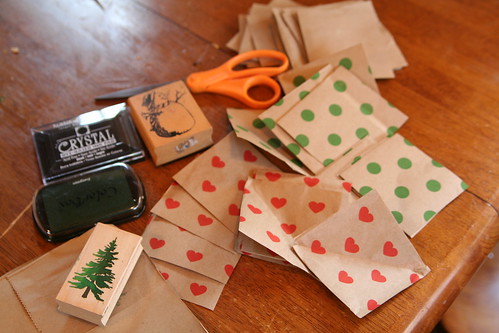
I’m not sure why, but I love the paper that grocery sacks are made from. Maybe it was all those years I covered my schoolbooks with them. Anyway, if you follow the folds of your grocery sack, you’ll basically cut squares. It wasn’t at all important to me that they be perfectly square or all the same size, or anything like that.

Stamping Gift Tags

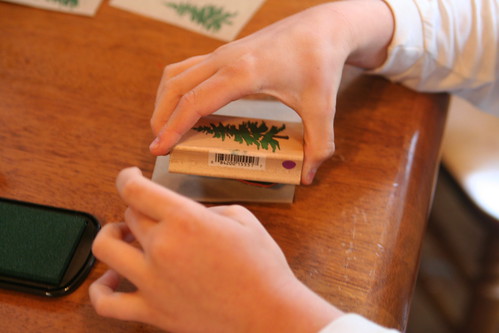
Lucas did a great job stamping these. They need only a “To:” and a “From:” added, don’t you think? (There’s a job for my Sharpie!) If you wanted to, you could get fancier and paint on some glitter or something.

Gift Tags

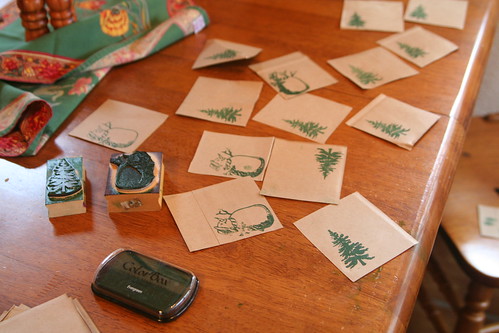
Voilà! We’re one tiny step closer to being ready for Christmas.

Christmas Tree

We have our Christmas tree now! We fetched it last Saturday from the bargain store for $10. Although driving up to an Apple Hill tree farm and cutting our own tree is one of my favorite family traditions, we felt this year that being frugal with both our time and money was a fair trade-off.  It’s easier to adapt if your traditions don’t have you in a stranglehold, I think. And being adaptable is important.

Cutting the Trunk

Ian’s very handy with a Sawzall. Doesn’t he look handy? Our bargain Douglas Fir tree is fresh and smells wonderful!

Our Bargain Douglas Fir

Seed-Bead Star Angel Tree Topper Happy Yule

We got it all decorated in one afternoon. To me our ornaments are like old friends; I’m glad to see them every year. Lucas was touched by all the “Baby’s First Christmas” ornaments that are his. (I regret that we don’t have many of those for Asher.)

Christmas Tree

I’m surprised at how many Waldorf wool angels we now have to hang on our tree!

Smiley Lights

Then we played with funny glasses from Captain Jack’s Smiley Bar to see smiley faces on our tree! Thanks T!

And thank goodness for SomaFM’s “Christmas Lounge” station—it’s Christmas music recordings that you mostly haven’t heard before. Happy listening!

Santa Lucia Day

We had a modest celebration this morning of Santa Lucia, the Italian saint adopted and beloved by Swedes. Lucia was a young woman who lived in 304 A.D. and gave her dowry to the poor. She was blinded, tortured, and decapitated for it. Saint stories are so grim! For me, well, I’ll skip that part.

Recipe for Santa Lucia Buns (Lussekatter) Lussekatter Dough Ready to Rise

It’s said that Lucia appeared to a starving village in Sweden with food and drink for all in need. She has captured the heart of Sweden ever since. (I wish wish wish I had a photo of collage-age Ian as a Star Boy singing to his professors in Upsala, Sweden, in 1993!)

1993 Ian as Star Boy in Upsala, Sweden
Edit 12/14/2010: I got my wish!!! Ian’s mom came over today and brought some mementos from Sweden, including this photo from 1993. Ian’s in the back row, third from the right.

Fresh Baked Lussekatter (Santa Lucia Buns)

Last year was a big year for Lucas‘s second-grade class to celebrate Santa Lucia Day, since they were studying saints. They dressed up and walked through the whole school, singing to all the classes and delivering hundreds of Lucia Buns, which I helped to bake. There is a wonderful blog post here, which gives lyrics to the Santa Lucia song.

This year I tried a different recipe (from a Swedish cookbook we bought at Ikea) and made them in the “Christmas cross” shape. Because Ian and I went to a Christmas party last night, I was baking buns at 11:20 p.m. folks. They were yummy and lovely on our breakfast table this morning.

Santa Lucia Buns for Breakfast

Today Lucas is home sick after being feverish through the night. Maybe we’ll make Star Boy hats for fun.

By the way, we’ve been reading a great book we found at the library called Lucia and the Light, by Phyllis Root and illustrated by Maria Grandpré. It is not the story of Saint Lucia, but is a story of a courageous young girl who must go and rescue the sun from mountain trolls, who have captured it. (Asher isn’t too sure about those trolls.)

Hope you’re finding plenty of ways to bring the light into your homes and hearts this season.

Soap-Making

My dear friend Dakini came over last Sunday night and taught me how to make glycerine soaps. It was tons of fun and very easy, and the results are so pretty!

Block of Glycerine Soap Melting Glycerine Rose Soap in the Pot Fragrance Options

We used herbs from my garden, such as lavender leaves and rosemary, dried lavender flowers we both had been saving, and several essential oils. We also used kitchen goodies like honey and oatmeal.

Assortment of Finished Soaps

We made clear lavender; pinkish lavender rosemary; honey oatmeal orange; honey beeswax lavender oatmeal; and finally, rose with pink dye. The golden soaps are colored only with natural honey.

Finished Soaps

I think they look spectacular. They are going to make great gifts.

Finished Soaps

The only limiting factor was the number of molds we had. (Silicone molds are the best because the soaps pop out so easily!) We made five batches of soap in one evening, using only one sausepan and a couple of tools like a measuring cup for pouring the melted soap and a spatula. We let the poured soap cool and set outside under the porch. We still have materials left over. Cleanup was … soapy; hot water was all we needed to melt away the congealed soap on our tools.

I would say this project is perfectly suited for children with adult supervision. Even little ones can help gather herbs, drip in fragrance or dye, and stir the pot. The soap melts on very low heat.

Then, when we were done with our project, we got to drink wine and eat a delicious chicken fricasée that Ian made. A perfect evening. Thank you, Dakini and Ian!

Good Saint Nicholas

We are celebrating the Feast of Saint Nicholas in small ways. I’m making a honey cake to eat after dinner tonight and yesterday, on the eve of St. Nicholas’s birthday, the children polished their boots and set them out to see if perhaps some treats might appear there. Indeed, Lucas and Asher did receive some traditional Saint Nicholas goodies this morning: oranges, chocolates, and walnuts.

This morning Daddy said, “Go look in your boots.” Asher was incredulous. “Go look in my boots?!” The poor kid teared up when he saw the orange in his red rain boots. He’s not a big fan of oranges. But when he found the chocolate he cheered right up again and gobbled some down. (Mmmm … chocolate at 7:04 a.m.!) Lucas opted to have his orange in his lunch box today.

I made this needle-felted Saint Nicholas to display for the holiday. He’s presently on our kitchen table with Sturdylegs the Donkey.

Needle-Felted Saint Nicholas

Kind old man, St. Nicholas dear,
Come to our house this year.
Here’s some straw and here’s some hay
For your little donkey gray.

Pray put something in my shoe,
I’ve been good the whole year through,
Kind old man, St. Nicholas dear,
Come to our house this year.

(from Germany, and the Winter book from Wynstones Press)

We are also reading Christine Natale’s St. Nicholas stories, which are found on this Saint Nicholas Center website along with lots and lots of Saint Nicholas resources and recipes. I admit I’m editing the stories a bit to make them suit our family. I really do like the examples of Nicholas doing good deeds as a boy; I think Natale has done a great job of relating the concept of generosity in a way that children can easily understand.

Second Grade Saints: Saint Nicholas
Lucas’s Saint Nicholas drawing from last year in second grade.

It is said that Saint Nicholas is the children’s saint because he rewards their goodness (and his buddy, Rupert/Krampus/Black Peter punishes bad children who don’t learn their lessons or obey their parents). Celebrating Nicholas’s giving spirit is good preparation for Christmas, which is why they call him the Advent saint. This celebration wasn’t part of Ian’s or my childhood (funny, considering our Austrian roots), so we are feeling our way into it and enjoying the parts we want.

There is a beautiful children’s picture book by Demi, The Legend of Saint Nicholas, published in 2003. Demi’s marvelous, gilded illustrations present Nicholas’s life and many miracles, and explain how he came to be the patron saint of so many groups. (There is one story I’m not at all fond of, however. I would recommend that parents read this book first, and then decide whether to present it to their children.)

Page from Demi's The Legend of Saint Nicholas

Do you celebrate this day? How do you celebrate?

Ice Lanterns

Third Ice Lantern Close-up
I read about making ice lanterns on one of my favorite blogs, Ordinary Life Magic, and just had to try it. Stephanie is brilliant and you should read her tutorial if you want to do this. Thanks for the inspiration, Stephanie!

Trouble is, where we live in California, we don’t have snow or freezing temps. But we do have …. (drumroll) …. freezer technology!

Lucas helped me clip and gather lots of little bits from our garden, which these days is looking a lot soggier, muddier, and more cluttered with decaying leaves than usual. Still, there are plenty of colorful bits and bobs to find: autumn leaves, berries, sprigs from our redwood trees, and even a few stubborn flowers still.

Yard Clippings for Ice Lantern

Fortunately, Ian hadn’t yet succeeded in his bid to get rid of the old and mismatched food storage containers, so I was able to use them. We had to find rocks to weigh down the inner container. This is when my kids lost interest, so I carried on bravely without them.

First, I froze an inch of water in my large, cylindrical container to make a base of the lantern. Then I set the smaller, weighted cylindrical container inside the bigger one. I put the nature bits and bobs into the space between the inner and outer containers, then poured water into the space and set the whole thing carefully on a level shelf in the freezer. I tested the ice after a few hours and decided it wouldn’t really be done until the morning.

The next day, we carefully transported the whole thing, containers and all—frozen solid—to brunch the next morning at our friends’ house. It was the hostess’s birthday and she is, and always has been, a candle nut, so we presented our ice lantern to her as a gift, with a gaily burning tea light inside it. It turned out beautiful!

Ice Lantern Birthday Gift

Some things I learned in doing this:

* Ice expands when it freezes (of course) and may make your outer container bulge if it’s plastic, so don’t use something you wouldn’t want to be ruined. (A coffee can might work best.)

* Don’t use glass; I used a glass jar as my inner container of one of my lanterns and it broke before it released from the ice.

* You can easily remove your inner container by pouring in some warm water. Just make sure you haven’t accidentally spilled water into the inner container before freezing, for of course, that will freeze too and make it difficult to pull out the inner container.

* If your ice lantern breaks into two pieces like mine did, you can put it back into the freezer (still protected within the outer container) and the broken parts will freeze together again.

* If you put your ice lantern on a plate or flat surface to display it indoors, it will probably slide around as it melts. I improvised a solution by putting down a paper towel first, setting the lantern atop it, and then disguising the towel with autumn leaves. If you have snow, you can put your lantern on a pile of snow, or I suppose sand would work to keep it centered, too, and would be naturally pretty.

Third Ice Lantern

Aerospace Museum

Handsome Sign
We used one of our precious Family Days during the Thanksgiving holiday to visit the Aerospace Museum of California, which happens to be in our town on a closed Air Force base. Ian and Lucas like this place a bunch. I was mainly along for the traveling StarTrek exhibit, which had … um … too many rules.

StarTrek Exhibit: "History of the Future"

Needless to say, we all had fun punching buttons on the Enterprise bridge and raising the deflector shields. Asher’s big idea was to fire the phasers on the aliens. We declined to pay $20 for a photo of Ian in Kirk’s chair. I found the costumes from the various TV shows to be pretty interesting.

Phoenix Mars Lander Replica: Aerospace Museum of California

In the main museum, we saw an exhibit about the future “Manned Mission to Mars” (planned for 2034), including this replica of the Phoenix Mars Lander …

Shot from Mars Exploration Movie

… and a movie about what going to Mars will be like someday.

Pilots Do This

There’s a mini jet plane for the kiddos.

Pilot Lucas

And outside they have a good number of real airplanes from various eras. This is Lucas in the cockpit of the “Warning Star,” an intelligence gathering plane. Asher was the cutest copilot ever.

Engineer's Fuel Mixture Station

An older gentleman docent inside that plane talked with me for quite a while about serving as ship’s engineer. He flew 6,000 hours on this type of plane, and his job was to monitor these gauges and manually tweak the fuel mixture for either fuel efficiency or increased power, depending on the situation. He blushed after a few minutes and exclaimed, “I don’t get many ladies asking me about this stuff. Most ladies don’t get it.” Ha! It was fun to make his day.

Right Here Is Where the Danger Is

Ian always knows where to find the danger. Especially when it’s this well marked. (This is the side of a Coast Guard helicopter.)

Through the Portal Window 1

Cogs

I’m not the biggest airplane fan, and frankly, I don’t need to return to this museum for a couple of years. But my boys enjoy it plenty.  And some of this stuff is pretty nifty even to me, like these cogs inside an engine on display.

The StarTrek exhibit is there until January, in case you want to check it out.

Pyanepsia

We have a traditional celebration called Pyanepsia, which is adapted from an ancient Greek festival. It is one of my favorite holidays of the year because it brings my darlings together for an evening of community, food, and thanksgiving. It’s a festival in honor of the changing of the seasons, from the outer to the inner, from the light into the darkness.

Can You Smell the Bay?

We use heaps of bay laurel.

Pyanepsia Celebration

We feast on fine foods, bean stews, and wine.

Candle-Making at Pyanepsia

We make candles.

Beeswax Dipped Leaves

This year, we dipped autumn leaves in beeswax to preserve them. Why not, when we were making candles anyway?

Tribal Eiresione

We make a giant communal eirisione, hung with wool and trinkets, evidence of our many blessings, in the hopes we will continue to be so blessed. Many thanks to our gracious hosts. xoxo

Thanksgiving

We have a quiet Thanksgiving Day today. Quiet enough to think a bit about what I’m grateful for.

* My beautiful sons, strong, brilliant, and hale. They are the sunlight of my days. They have transformed me.
* My loving, noble husband who takes care of all of us and brings out the real me. He is my shelter and my heart.
* My parents and Ian’s parents, for all that they are and do, and for all they helped us to become.
* My precious, clever, quirky, shining friends. They know why.
* My safe, comfortable home filled with all that I really need and lots more besides.
* My ever-hungry brain and my many hobbies, which nourish me in so many ways. I am still growing.
* My undeniable, abundant opportunities, a plethora of blessings and experiences that I’ve enjoyed all my days. I am especially grateful that we can now offer amazing opportunities to our children as they grow.
* My family members whose love and courage are so great that they do the tasks that no one else wants to do.

We are so very, very rich. I am sending out my love to all of you on this Thanksgiving Day. Blessed be.

Second Grade Form Drawing

Easy Autumn Garland

Finished Pressed Leaf Garland

We’ll call this a tutorial, shall we? Here’s a super easy project that Lucas and I made together in about 40 minutes today. You could easily have one or several of these ready for Thanksgiving Day, if you’re still wondering how to decorate for the holiday. The cost of this project was about $2. This garland works best hanging straight, with the ribbon flat against a wall surface, counter edge, or the like. I bought 1 inch purple ribbon at the craft store weeks ago. Any color you like will do nicely. Find, gather, and press beautiful fallen leaves. Go for a walk through your yard or neighborhood. Notice all the colors and different types of deciduous trees in your area and pick up the ones that still feel fresh—the ones that haven’t yet started to dry and curl up. I do this constantly because I adore autumn leaves. Some are so beautiful they make me tear up. I looked for variety in type of leaf, size, and color. Any leaves that strike your fancy are the right ones to collect! Pull that old paper phone book out of the closet or mud room. Or maybe a new one was recently delivered to your driveway. I have no use for a paper phone book other than this: Put your collected leaves in the pages, in a single layer. Leave a few pages in between each page with leaves. Cram as many into the phone book as you like. Weight the phone book down with something very heavy, like a big stack of books or a cast-iron pot. Wait two to four days. Pull out your scissors, ribbon, and glue gun. Make sure you have glue sticks (I often don’t). Carefully remove your very flat leaves from the phone book.

Making the Pressed Leaf Garland

Tape your ribbon to your table so it doesn’t slide around. Glue pressed leaves on the ribbon in a jaunty way. Vary their colors, shapes, and sizes as you like, or make a garland of all one type, if that’s your style. Maybe you like the look of all the leaves “pointing” in the same direction. Maybe you like them arranged sort of haphazardly. If you’re not sure, lay them down a few different ways until you decide what you like and only then start gluing. If you use big leaves, your project will go even quicker.

Making the Pressed Leaf Garland Any child who is old enough to operate a glue gun can help with this. Only a drop or two is needed to fix each leaf to the ribbon. Lucas Gluing

The hardest part of this is hanging the garland. It is fragile, and you may need an extra pair of hands to hold it while you fix it to the wall, either with tape or thumb tacks (I used both).

Finished Pressed Leaf Garland Finished Pressed Leaf Garland

Pretty, no? Well I like it. I like that it was cheap. I like that it was easy. I like that we have brought some of those gorgeous leaves into my home. And I really like that Lucas and I made it together.

  • About Sara

    Thanks for visiting! I’m Sara, editor and writer, wife to Ian, and mother of two precious boys. I am living each day to the fullest and with as much grace, creativity, and patience as I can muster. This is where I write about living, loving, and engaging fully in family life and the world around me. I let my hair down here. I learn new skills here. I strive to be a better human being here. And I tell the truth.

    Our children attend Waldorf school and we are enriching our home and family life with plenty of Waldorf-inspired festivals, crafts, and stories.

    © 2003–2018 Please do not use my photographs or text without my permission.

    “Love doesn’t just sit there like a stone; it has to be made, like bread, remade all the time, made new.” —Ursula K. LeGuinn

  • Buy Our Festivals E-Books


  • Archives

  • Tags

  • Categories

  •  

  • Meta