Garden Mandalas

Garden Mandala No. 41 #spring #gardening #flowers #mandala #flowerstagram #landart #gardenartflowers #gardenart #geranium #mallow #plum #locust #azalea #cross #square #quadrants

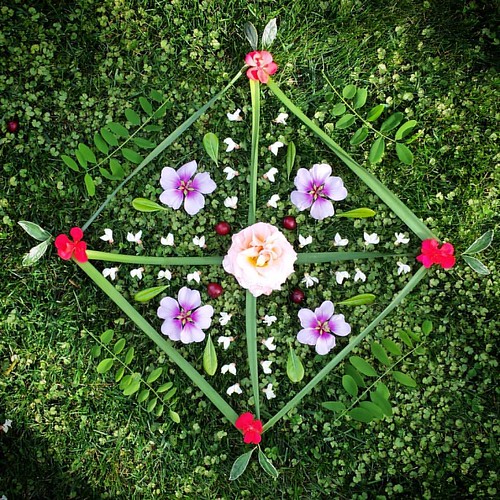
I’ve been making mandalas from flowers and leaves since February 23. It has become my meditation, my art project. It’s how I’m dealing with stress and anxiety. I am a huge fan of land art, ephemeral artworks made of natural, found materials and installed in natural spaces. This is my own little contribution to the art form. I love flowers and used to be a florist, so it seems to fit.

Garden Mandala No. 44 #spring #gardening #flowers #mandala #flowerstagram #landart #gardenartflowers #gardenart #waldorfhome #ephemeral #roses #lavender

I am using primarily materials from my own garden and yard. Occasionally, when in a wild place or undeveloped lot, I will pick some wildflowers to use, but only if they are totally plentiful. I’ve made mandalas in my parents’ yard and in my in-laws’ yard, using their plants and flowers. I’m not buying cut flowers for this project, it’s just what I can glean.

Garden Mandala No. 38 Every day there's something new to use. #spring #gardening #flowers #mandala #flowerstagram #landart #gardenartflowers #gardenartflowers #square #cinquefoil #locust #lantana #roses #petals #leaves #catkins

It seems that every few days a new plant is blooming, making its flowers or pretty leaves available to my art. I don’t want to denude anything, of course—I grow my garden so that it’s beautiful and pleasant to be in—so I only take bits that are abundant. I carefully consider whether I can spare the flowers.

Garden Mandala No. 36 Office park landscaping and riverside wildflowers #spring #gardening #flowers #mandala #flowerstagram #landart #gardenartflowers #gardenart #star #starofdavid #thistle #wildflowers #waldorfhome #weeds

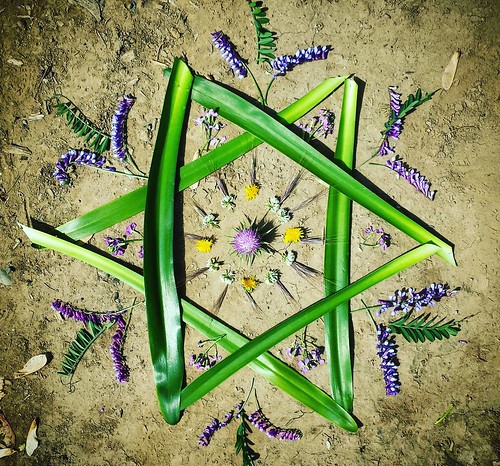
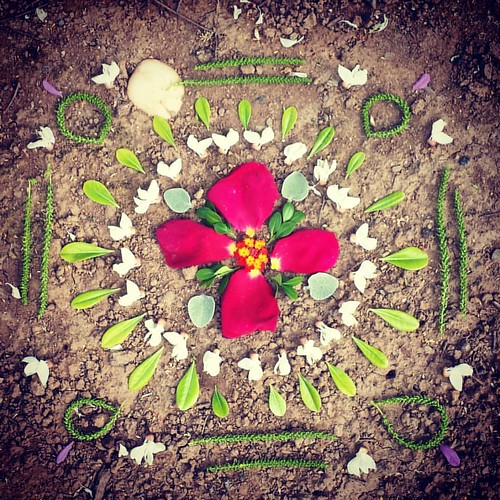
There’s a kind of sacred geometry to these, I think, as is so with all mandalas. I enjoy playing with forms. Each mandala has something wrong with it, a kind of wabi-sabi element. Somehow, this delights me. Even though I really do try to make them symmetrical and geometrical and “right.” Tiny pieces sometimes move out of place. Usually I don’t see their flaws until after I’ve taken the photo and walked away, or the wind has moved all the bits around and destroyed the pattern. Then I take a deep breath and decide to love the mandala anyway.

Garden Mandala No. 34 It's such a beautiful day! Happy Friday, friends! #spring #waldorfhome #mandala #gardening #flowers #leaves #landart #mallow #flowerstagram #azalea #periwinkle #oxialis #grass #japanesemaple #gardenart #ephemeral

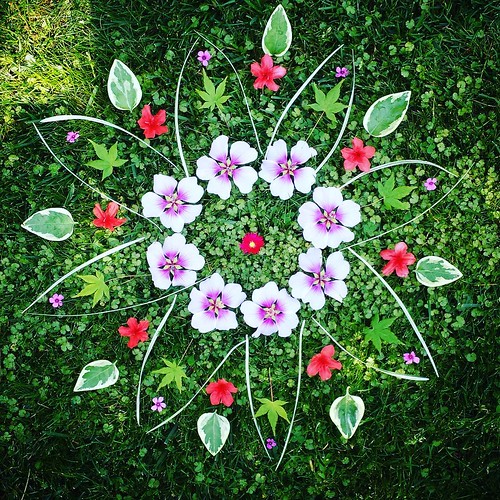
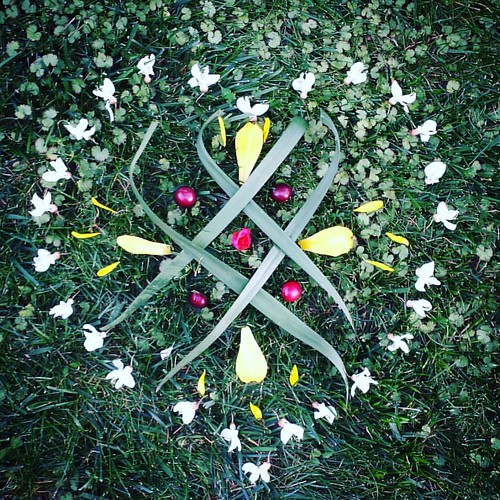
Some mandalas are simple and some are complicated. I’m enjoying exploring shapes and textures, as well as colors and all their myriad combinations. Sometimes I use bare ground or my lawn as the background. Other times I’ll find a place under a tree where there’s bark or needles. I think the background contributes to the overall feeling of each mandala. So far, every one of them is unique in many ways.

Garden Mandala No. 30 #spring #gardening #flowers #mandala #triangle #flowerstagram #roses #calendula

The wind is my enemy when designing a piece. Various sun versus shadow conditions can also be tricky, I’ve learned. Time of day matters, too. If it’s too late in the evening, I find my photo isn’t as nice because of low light. If the day has bright, bright sun, I often can’t tell by looking at my viewfinder if my photo has captured it properly. After taking shots, I play with the brightness, saturation, shadows, and other elements of the photo to try to pull out the best qualities of each mandala. I’m no whiz at postproduction, but I get in there and mess about anyway.

Good morning! Garden Mandala No. 2

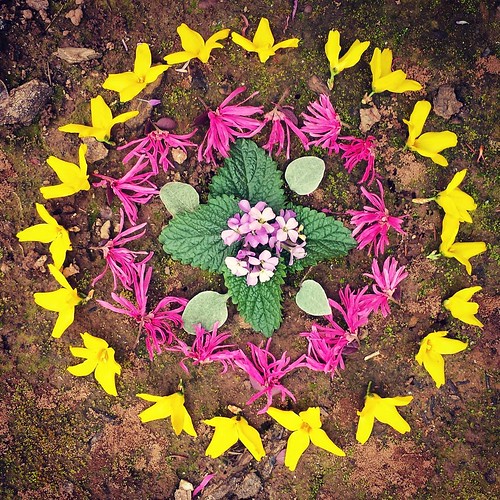
Even if I’m using many flowers of the same type, or many leaves from the same tree or bush, each one is different. I like that these same-element groups don’t always behave the same, or look quite the same, or have the same size, color, or texture, but when viewed as a whole, sort of cooperate and can be taken together.

I think most of all, what I like about making these is that they make me happy. They’re little earthy prayers of my own making, arising from my wild mind and creative soul though the work of my hands, arranging materials that delight me. They are quieting, when my mind is racing. My mandalas give me a moment to stop everything, take a few moments outside, and make something beautiful, even if it lasts only a little while.

Garden Mandala No. 43 Friday I'm in LOVE #spring #gardening #flowers #mandala #flowerstagram #landart #gardenartflowers #gardenart #locust #plum #daylily #heart #mandalaart #ephemeral

I also love that they make other people happy. So, dear friends, thank you for the encouragement and kind words. I think I’ll keep making my garden mandalas for a while longer.

CNC Mill for 8th-Grade Project

Couldn't be prouder of my son!

I have to take a moment to say I’m so proud of my amazing son. Lucas had a huge win earlier this month way back in December when he presented his eighth-grade project to his classmates, family, and our school community. He spent five months of 2015 fabricating a CNC mill, with two of our dearest friends, Thomas and Jeff, as mentors. He wrote a big paper, made a working milling machine, learned about electricity, circuits, and Arduinos, learned how to write G-code, and presented his 10-minute speech and his machine on December 3.

CNC machine moves in three axes!

A very happy moment in the 8th-grade project! Three axes move on the CNC machine!

This project was hard work. It required perseverance and investigation into lots of new territory for Lucas. During the course of this project Lucas and his mentors did something really amazing and unlike anything he had ever done before, but they also suffered delays and setbacks, and occasional back-to-the-drawing-board moments. What a gift it is to learn about failure with someone who will help you pick up the pieces, emphasize what you learned from the mistakes, and then begin again on a better path with you! It’s priceless!

They worked nearly every Tuesday evening for five months. Lucas had approximately 80 hours invested in this project. Furthermore, they had a great time doing it.

CNC mill demo, 8th-grade project presentation, Sacramento Waldorf School #waldorf #sacramentowaldorfschool

His paper deftly explained some pretty technical stuff, and his speech quickly walked his audience through what Computer Numeric Controlled machines are, how they work, and how he and his mentors made the machine. Then, for a grand finale, he turned it on and it cut a picture stand out of foam core, which was decided upon because the tool could accomplish the job in under two minutes. If they had demonstrated the CNC mill with a more complicated project, or with a denser material, it would have taken too long for his allotted speaking time. With flourish, he punched the picture stand out of the foam core, creased it along the center line, stood it up, and then placed upon it a wooden sign engraved (by the CNC mill) with “Questions?” The applause was wild and he beamed. I wish I had a good shot of that moment.

2015-12-03 18.45.54

Lucas got an A+ on his eighth-grade project. It was so wonderful to see his hard work rewarded! The best part perhaps is that he is still so interested in the project that he and his mentors continue to work on it, refining it, refining it. Recently Lucas learned how to solder. He’s expressed an interest in learning to code, and that’s terrific.

Over the four nights the eighth graders presented, we heard about so many wonderful topics: fly fishing, competitive road racing, cosmetology and hair cutting and styling, drones, a diesel ’68 school bus converted to run on vegetable oil, wood duck nests and conservation efforts on the Pacific Flyway, the effects of sleep deprivation on a young teen, rowing and crew, drumming, music therapy, natural horsemanship and horse training, building a computer, and many more. I’m so very impressed with these young people, and so grateful that their first major research project and paper was on topics of their own choosing, which I believe made the whole experience as reinforcing as possible.


Yarn Necklace for Mother’s Day Tutorial

Yarn Necklace

Are you hoping to make a special Mother’s Day gift for mother or grandma, or perhaps an end-of-year gift for a teacher? This yarn necklace is easily made by children who have a little finger knitting experience, in fact, my son made one for me when he was in the first grade and recently taught me how to make it. This kind of cord-making is called “finger knitting” and “finger weaving.” (Besides necklaces, you can make scarfs, braceletes, belts, or headbands in this way.)

Materials

  • wool or cotton yarn in a pretty color

Start by placing the tail of your yarn in the crook between your thumb and forefinger so that the tail hangs down over the back of your hand. Use your thumb to pinch the tail and hold it in place. Take the ball end of your yarn under and over, under and over your four fingers, wrap it once around the pinkie finger.

Continue weaving the working yarn under and over, under and over, traveling back toward your index finger.

Wrap the yarn around your index finger and go under and over, under and over until you go around your pinkie again, and then weave it back toward your index finger in the same manner. Wrap the yarn one more time around your index finger and let the ball end rest across your palm. You should now have two loops (horizontal bands) of yarn on the front of each finger as you see in the photo below.

Now, beginning with your pinkie finger, grasp the lower loop with the fingers of your other hand and lift the lower loop over the upper loop …

… and completely off the pinkie finger as in the next photo below.

Now release the loop. Your hand should now look like this photo below, with two loops on the first three fingers and only one on the pinkie finger.

This action of moving the bottom loop over the top loop and off the finger is finger weaving. You will repeat this action with the remaining three fingers (ring finger, then middle finger, then index finger).

As before, with the ring finger, lift the bottom loop up and over the top loop, and then off the finger altogether. As you complete this procedure with each finger, you’ll see that you now have only one loop left on the finger.

When you reach the index finger, the yarn tail that your thumb has been holding in place acts as your bottom loop. Treat it as any other loop and lift it up and over the top loop and off the index finger.

The tail will now trail down between your index finger and your middle finger.

Now grasp your working yarn and wind it under and over your fingers as you did before, under and over, and around your pinkie finger so that your new loops are above the loops already on your fingers. Then continue winding the yarn under and over, under and over until you’re back to your index finger again. You should now have two loops on each finger again.

The loops are now high up on your fingers. Push the loops down to the base of your fingers. Then, as you did before and starting with your pinkie finger, pull the bottom loop up and over the top loop and let it go. Repeat for all four fingers exactly as you did before.

Push your stitches down again. Weave your yarn again, under and over, under and over, around, under and over, under and over above the loops already on your fingers, until you have two loops on each finger again.

As you repeat this process of pulling bottom loops over top loops again and again, row after row, you will begin to see the woven cord coming off the back of your middle and ring fingers, as in the photo below.

The woven cord looks kind of flat at first, but when you’re done and you tug it gently a few times, it will become a round cord for your necklace.

When your cord is long enough, it’s time to cast off. (Experiment with the length by putting it around your own neck while it’s still on your fingers. If you can see the necklace when you look down, chances are good the cord is long enough and stretchy enough to easily fit over a head.)

To cast off, begin with only one row of loops and don’t weave new loops above them.

Instead, lift the loop on the pinkie finger off the finger and place it on your ring finger. Your ring finger now has two loops and your pinkie has none, as in the photo below.

Lift the bottom loop over the top loop and release. Now your ring finger has only one loop. Pick up that loop and move it off your ring finger and place it on your middle finger, which now has two loops. Lift the bottom loop up and over and release. Now move the remaining loop on the middle finger to your index finger. Lift the bottom loop over the top loop and release. Now your index finger has only one loop and your other fingers are bare. You may now remove the final loop from your hand, cut your yarn, pull the working yarn through it, and pull it tight. Now pull the tail on the other end of your cord tight.

Now gently tug on your cord so that it becomes round rather than flat. Tie the two ends together, making a circle necklace.

The necklace should be stretchy enough that it can easily go over head of the lucky person you give it to. She will treasure it more than she would any chain of gold.

Happy Mother’s Day!


(This tutorial was originally published in the Little Acorn Learning May Enrichment Guide. Check out all their many wonderful offerings at Little Acorn Learning.

Sharing Seeds Project

Seed Sharing Project

There has been a lot of this kind of mess here at my home over the last few days. I got it in my head that it would be fun and efficient and frugal to harvest seeds from my garden and my mother-in-law’s garden and use them for planting this spring. See how I saved some pennies there? I’ve been painstakingly dismantling flower heads and seed pods. I have marigolds and hollyhocks and morning glory seeds in abundance!

Amarylis and Seeds Project

Thank goodness I have this nifty tray to keep the mess contained.

Seed Sharing Project

Well, I realized I have so very many seeds from this project that I’ve offered on my Facebook page to share them out to anybody who wants them. I thought I’d do the same here.

Sharing Seeds Project

Seed Sharing Project

Sharing Seeds Project

So I’m packaging up pinches of seeds in a not-very-fancy-or-stylish sort of way and mailing them out to a few eager recipients. Let me know if you want some! I’ll do this until I run out. I guess you could call this a tiny giveaway.

Some gardening caveats: Morning glories spread like the dickens, so if you like that sort of thing, you’ll love them. If you don’t, well, NEVER plant morning glories. Hollyhocks take up to two years to bloom, and they grow very tall and self-seed. Marigolds are annuals, but they are hardy and you can use their petals for dyeing.

XOXO May your gardens bloom like mad this year!

Third Grade Shelter Project

Lucas has been very busy for the last week and a half working on his major project for third grade. In the Waldorf schools, third graders study lots of practical things like cooking, measuring, building, and making clothing. They also study shelters—the various types of homes people made or make for themselves in different parts of the world throughout history. The students have to choose a people with a particular type of shelter, build a diorama of their shelter, and write a report about it.

This the first big homework project, and it synthesizes what the students are learning in school with all kinds of other awesome qualities of third graders: their practicality, their extensive experience of modeling, their creative thinking, and their love of measuring, using tools, and building. It also calls into use their developing writing skills, their recent study of grammar and parts of speech, their artistic ability, their awakening to the real world around them and awareness of others, and their blossoming love of realism.

Making the Gunwales

Lucas wondered if he could make a house boat for his shelter project—after all, some people live on house boats. After some research, he and Ian hit upon a people indigenous to the Andaman Sea called the Moken, and we checked in with Lucas’s teacher to get her okay to proceed.

The Moken live on their handcrafted boats, called kabang, most of the year, and travel around the islands off the coast of Thailand. During the monsoon season, they live on land, but that’s only about three months of the year. They fish and trade fish for rice. Their kabang keels are dug-out logs that are passed down from father to son. “It can take a family four months to build a kabang. The traditional boats have sails and oars, but the new boats run on diesel engines” (from Lucas’s report).

Lucas used clay to make his kabang keel. Bamboo skewers were used as struts on which to weave the boat’s gunwales, which are traditionally made from zalacca wood. Lucas made his from garden twigs. He built the shelter on the deck of the kabang and thatched it with more twigs.

Making Beeswax People

Lucas modeled two Moken people out of beeswax. (Whole families live on these kabang, and the boats travel in groups of six or more.)

Lucas Weaving the Kabang Sail

Then Lucas wove a sail from raffia. The Moken use pandanus leaves to fashion their sails.

Third Grade Shelter Project: Mr. Moken Spearfishing

Here is the finished kabang shelter. Mr. Moken is standing in the sea, fishing with a spear. The kabang flies the Thai flag. The Moken people spend much of their time in the sea diving for shellfish, and studies show they’ve developed better underwater eyesight. “The sad thing is that there’s only about 1,000 Moken living on the sea today because the Burmese and Thai governments are trying to get them on land.”

“I want to go there and help them out. I also want to build a kabang with a Moken,” Lucas concluded.

This was a tough project, but one that was very rewarding, I think. Making something with his hands helped Lucas engage with the material, much more so than simply writing a report would have done.  It was also great to see Lucas work so hard over so many days, with his dad’s careful support and supervision.

Lucas and his classmates will also present their shelters to their class and talk about them. They will answer questions from the teacher and classmates as well. I’m proud of all of these kids for accomplishing something that took two weeks or so to make; perseverance is an important trait to develop.

2011

January
A new year! Can you believe it? I admit to feeling a little insular lately, an unusual state (for me) of being somewhat introverted. I can sense a lot of questions circulating inside of me and so I’ve not had many words to share. I feel there is some fertile ground ready and waiting, and I’m not sure what seeds to sow there. I’ve been walking in circles restlessly, and yet trying to take advantage of small moments of quiet to hear … I don’t know what. Hopefully something important and moving.

I guess this is all OK. It is the quiet, dark time of the year, the time of hibernation and lying fallow in the cold. Resting is not my strength, frankly. I am in between creative projects. I have impulses to jump in several directions at once, which has me kind of teetering. Whatever. I’m just trying to give myself some time to figure things out. Who knows, maybe I’ll be given the gift of some understanding or revelation on the Epiphany, just a couple of days from now. Wouldn’t that be nice?

And so, since I don’t have much to say, I’ll take a moment to brag about some of the Christmas projects we did last month.

Christmas Project: Poplar Cutting Boards
Poplar cutting boards for friends and family. We made a cat, two owls, a tropical fish, an apple, and a leaf. I love them.

Christmas Project: Nature Table Evergreens for Friends
I learned to use the scroll saw and cut out these pine wood trees for some friends. I hope they might find a place on their winter nature table. I used the same acrylic wash to paint them, and used a beeswax polish to seal and shine them up. I’m looking forward to making some of these for our home, too.

IMG_4312

IMG_4293
Ian made some marvelous wood stilts for Lucas for Christmas. They are hard to use at first, but Lucas has already practiced with them enough to have gotten the hang of it.

And now that the rush and business of Christmas is done, it’s time to start thinking about Asher’s upcoming birthday.

Thar Be Dragons

Asher is really into dragons. He has been playing dragon for quite some time, but we were recently inspired by this book, Tell Me a Dragon, by Jackie Morris. It is simply beautiful and I fully recommend it. It was published in 2009 by Frances Lincoln Children’s Books.

IMG_2303 IMG_2302 IMG_2304 IMG_2305

We have been wanting to make some wooden toy figures for a long time, so making him a dragon for Christmas seemed like just the right thing. We used a scroll saw with a blade that turned out to be too lightweight for the job, and yet, it got the job done.

Christmas Projects: Wood Dragon in Progress

I drew the dragon on paper and cut it out, then I traced it onto a piece of pine. I wish I had paid more attention to the back side of the board, as the back was flawed and we didn’t notice until our dragon was cut out. (Thank you, Ian, for doing the scary work with the saw.) At this point, we were so pleased with our cutout that there was no turning back.

Christmas Projects: Wood Dragon in Progress

I used regular old acrylic craft paints, slightly watered down, to make a kind of color wash. The wood absorbed the wetness quickly, but there were a few seconds with each application when the colors would blend nicely like watercolors. I painted this dragon in several sessions because I needed to let it dry in between.

Christmas Projects: Wood Dragon in Progress

The face was last, and I’ll admit I was really scared I’d mess up on the face! I was hoping to achieve a face that looked both friendly and fierce—kind of a tall order! (I am really pleased with how the tail works like a handle. It feels really sturdy.)

Christmas Projects: Horse, Dragon, and Knight

Of course, what do you do with just a dragon? Along the way, we created a knight and gave him a horse to ride. The horse had to be to scale to the knight, who was done first, but couldn’t be as big as the dragon. Tricky!

Ian was really clever with the knight’s paint job, I think. They look marvelous together. The figures were sanded lightly after painting to smooth them, then finished with a beeswax and lavender furniture polish. They smell and feel delightful.

Now, let’s hope Asher plays with them!

Christmas Projects: Woodworking

I can’t say much about these Christmassy doings yet. Some of what we are making are for our kiddos, but some are for friends and family and I don’t want to spoil the surprise. Suffice it to say, we are spending some cold, cold hours outside in the garage …

Christmas Projects: Scroll Saw

We are struggling to find secret moments without the boys watching …

Christmas Projects: Scroll Saw

And I am using power tools!

Christmas Projects: Gift Tags

Although I used to go all out when wrapping gifts, in recent years I’ve become … let’s say …  somewhat busier and lacking time for such frippery. In fact, lately, my answer to labeling packages at Christmas has been simply to pull out my black or red Sharpie and scribble directly onto the wrapping paper. Frankly, it kills me to spend money on this stuff.

I’m still lacking time, but this week I had a sick boy home for two days with a fever, and whenever that happens he begs me to come up with things for him to do to pass the time at home while I’m working.

So, we made some simple gift tags from recycled (repurposed?) paper. Not fancy. Not fine. But fun, useful, and it couldn’t be easier.

Gift Tags Project: Repurposed Grocery Bag Gift Tags Project: Repurposed Grocery Bag

Yep. It’s a paper grocery sack, cut roughly into squares and stamped with my two Christmas stamps. My mother-in-law gave me the snowman when she retired from teaching third grade. The tree stamp is one we bought to make gifts about five years ago. I love it when we can do a project without buying anything new.

Gift Tags Project

I’m not sure why, but I love the paper that grocery sacks are made from. Maybe it was all those years I covered my schoolbooks with them. Anyway, if you follow the folds of your grocery sack, you’ll basically cut squares. It wasn’t at all important to me that they be perfectly square or all the same size, or anything like that.

Stamping Gift Tags

Lucas did a great job stamping these. They need only a “To:” and a “From:” added, don’t you think? (There’s a job for my Sharpie!) If you wanted to, you could get fancier and paint on some glitter or something.

Gift Tags

Voilà! We’re one tiny step closer to being ready for Christmas.

Firebird

This story is really not about me, but I’m going to tell my part in it because it gave me great joy.

Lucas’s class is performing the Russian story of the Firebird in Eurhythmy this week. The performance is on Thursday and they’ve worked quite hard on it. I cannot wait to see this performance and I know already it’s going to make me cry. Lucas is excited about it, too.

A whole crew of volunteers was recruited to sew fancy dresses for the girls to wear. I was asked to do this part: paint the Firebird’s fabric wings.

With paints.

I love paints.

I love to paint.

Paints

Demi's Firebird

The Firebird The Firebird

Here’s my inspiration and reference material: The Firebird by Demi.

Beginning

So this is how I spent part of my Sunday afternoon, outside in my unseasonably warm backyard, with the fabric clipped to my fence, while the wind rushed about blowing leaves into my way.

Firebird Wings in Progress

This is how I left it last night, with the back almost finished (not all the tail feathers were done). Today I painted the front because when the Firebird spreads her wings, you’ll see the underside. I’ve also spent some time adding details, like more gold shimmer.

I don’t have a daylight photo of the wings finished at this point. I’ll try to snap one in the morning before I send this off to school. I fervently hope that this garment will work. The paint has made the fabric pretty stiff, so I’m hoping the Eurhythmy teacher doesn’t expect lots of flowing, draping softness!

Doing this was such fun! I wish I could paint more often!

  • About Sara

    Thanks for visiting! I’m Sara, editor and writer, wife to Ian, and mother of two precious boys. I am living each day to the fullest and with as much grace, creativity, and patience as I can muster. This is where I write about living, loving, and engaging fully in family life and the world around me. I let my hair down here. I learn new skills here. I strive to be a better human being here. And I tell the truth.

    Our children attend Waldorf school and we are enriching our home and family life with plenty of Waldorf-inspired festivals, crafts, and stories.

    © 2003–2018 Please do not use my photographs or text without my permission.

    “Love doesn’t just sit there like a stone; it has to be made, like bread, remade all the time, made new.” —Ursula K. LeGuinn

  • Buy Our Festivals E-Books


  • Archives

  • Tags

  • Categories

  •  

  • Meta