Wood-burned Garden Markers Tutorial

IMAG2978

Are you poring over seed and flower catalogs, itching to get your fingers dirty by planting your garden? Are you still stuck inside, or unable to plant because of cold temperatures? Here’s a little project to help you while away the time until you can get out there and start growing: Make wood-burned garden markers. We made these as a Christmas gift for grandparents and they were a hit. They are simple, inexpensive, and sweet.

Materials

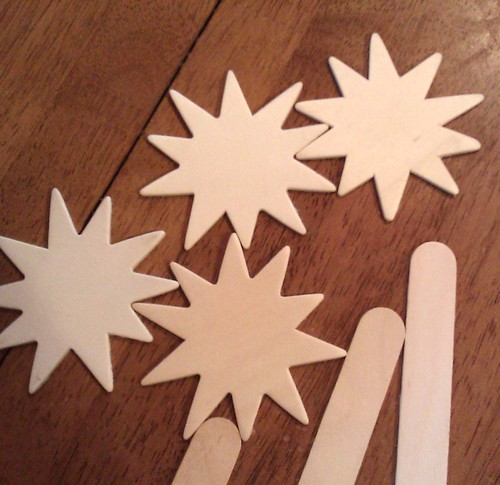
  • wide craft sticks (tongue depressor size)
  • wood sun shapes
  • wood glue
  • watercolor paints or craft acrylics
  • wood-burner tool and tip
  • wood varnish

IMAG2949

Tutorial

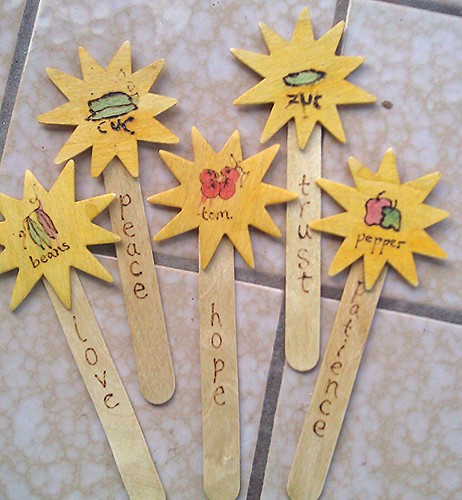
These materials can all be found at a craft store such as Michael’s. We liked the sun shapes; we thought garden markers with sun shapes would be most appropriate for making garden plants grow big and strong and bountiful.

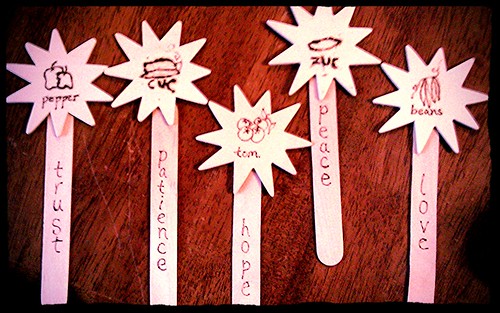
Start by deciding what plants you want markers for. Summer veggies or herbs are great. Practice drawing the fruits on paper a time or two, so you know how you want your wood-burned markers to look. Keep your drawings very simple because the wood-burner tool is more difficult to draw with than a pencil. We decided it was OK to abbreviate some of the longer vegetable names.

IMAG2950

My 10-year-old son did a couple of these, so I know a careful, older child can successfully use a wood-burner. Just stay nearby and encourage safe habits. The wood-burner gets very hot! (Be sure to protect your work surface, especially if it’s wood!) While using a wood-burner, you have to draw slowly, allowing the tool to make a mark on your pale wood. Be patient and go slow.

We decided that the marker stakes should also have words of inspiration for gardeners. We wrote “trust,” “patience,” “hope,” “peace,” and “love.” These are some of the qualities people need to make a garden grow, of course. Other virtues might be “caring,” “tenderness,” “gratitude,” “faith,” “prosperity,” “sufficiency,” “serenity,” and “tenacity.” Or maybe “sweetness,” “juiciness,” or “plenty.”

Glue your sun shapes to the craft sticks. Now you can choose to paint them with your watercolors or other paint, or you can leave them plain. We wanted ours to be colorful. If you’re using watercolors, be careful and put only a little moisture in your paint to color the vegetables. Too much water can make it run (like on our tomatoes). After you paint your veggies, paint the rest of the sun gold.

When all parts of your garden markers are dry, give them a good coat of varnish. This will protect the wood a bit from the elements. Now you just need to plant!


Our Hobbit Tutorial at the Family Book Festival

IMG_4296

FBF-facebook-timeline

Please join me and my family at today’s post on Jump Into A Book. We were delighted to be asked to contribute to this year’s Family Book Festival, which features book reviews and activities by other bloggers, artists, and writers. These wonderful posts are designed to get you and your family reading together and enjoying literature and family time.

We created a project based on The Hobbit: There and Back Again, by J.R.R. Tolkien because we all love the book so much. Just arriving at the decision of what to make was a long journey in itself! We’ve shared our process and a tutorial for making a diorama of a scene from the book. There’s modeling material, paint, gold foil, and dragons! What could be better?

Be sure to browse at Jump Into A Book and read all about the project other families did, and don’t forget to enter the giveaway—you or your school could win 31 Dr. Seuss books! Giveaway closes at the end of March 1st 2012 at 11:59 pm. The winner will be announced on Dr. Seuss’s birthday, March 2nd.

Many thanks to Valarie for inviting us to play in the Family Book Festival!

FBF-widget-300px

Valentine Making Party

Hearts

This was the scene in our home this past weekend. Our kids sat down with us and tackled their two class sets of valentines. I helped by cutting out many, many hearts …

upload

And amid kitchen clutter and projects and homework, we all set to work. Holidays always have to fit into the middle of everyday life, don’t they?

Making valentines. Making valentines

Lucas was totally independent. He’s a pro at valentines now. Asher needed some coaxing, but soon got into the swing of things. Honestly, I couldn’t believe we finished them all in one session!

upload

The smiley faces and bear faces were his idea. I have revived a practice I had as a little girl, saving flower catalogs and using their pretty flower photos for making valentines.

upload

Even Daddy got to make some valentines to show his appreciation for some co-workers.

Lucas's Valentines, 2013

Here are Lucas’s valentines. There’s something so boyish about them. We considered a fancy crafty-type of thing, but he chose the simple route.

So, now the house is decorated a bit. Red tulips are arranged in a crystal vase on the table. Tomorrow we’ll wake up to a Valentine’s Day breakfast, with a special treat or two—because it’s these three boys who hold the key to my heart, and every day I would like to give them all the sacred oceans, the beauteous moon above, sunshine magic, and a daily miracle if I could. It is for them my heart beats.


Papercut Banner for Chinese New Year Tutorial

Completed Red Paper Banner

Does your family celebrate Chinese New Year? We have just begun the Year of the Snake. “This 2013 year of Snake is meant for steady progress and attention to detail. Focus and discipline will be necessary for you to achieve what you set out to create.” In the spirit of the Chinese art of paper-cutting, I offer this simple papercut garland craft tutorial for you to decorate your home. If you and the kids can cut a paper snowflake, you can make this.

Materials

  • red square kite paper, red Japanese silk paper, or squared red construction paper
  • scissors
  • yarn

Making

Tutorial

If your paper isn’t already square, make it so.

Fold each square into fourths (in half and then in half again). Cut an interesting pattern into the square, in the same way that you would cut a paper snowflake. Chevrons, stripes, triangle, curls, “snakes,” and hearts are all good shapes to cut. Be sure that you are cutting through all four layers of paper. Although you can cut off the “middle” corner to make a center hole, try to preserve each of the other three corners. This will keep your paper flags square.

Red Paper Banner

If you cut five or seven or more of these, you can string them onto a piece of red yarn to make a festive banner to hang in your home or school. Each flag can be unique.

My Paper Flag

Your banner will do double duty as a Valentine’s Day decoration, if you cut a few hearts.

See more wonderful festival craft projects in our Festival E-Books, by Eileen Foley Straiton of Little Acorn Learning and myself. The Spring Festival E-Book is coming soon! We are hard at work on this e-book now. Stay tuned!


Ice Medallion

IMG_0010

If you live in a warm area like mine, winters are less about snow and snow play and more about crisp days, rain, fog, and overnight freezes. Back in December, we observed that nights of below-freezing temps were causing our birdbath to freeze over. We decided to do an experiment to see if we could remove the sheet of ice from the birdbath without breaking it. When that proved possible, we wondered if we could maybe decorate the ice and freeze pretty bits of nature into the ice.

IMG_9835

We put some winter bird berries and bits of evergreen needles on the large disk of ice, then laid the ice disk back into the birdbath (with nature bits on top of the ice). We added a little very cold water from the garden hose and waited for the next overnight freeze. We didn’t know if our experiment would work!

In the morning, we found the birdbath iced over again, and our leaves and berries embedded in the ice (but moved from our original placement). We had to wait a few hours for the day to warm enough for us to lift the ice out of the birdbath. While we waited, we brought a bowl of warm water from the house and warmed a metal kebab skewer in the water. We carefully bored two holes in the ice disk while it was still seated safely in the birdbath.

IMG_0005

We lifted out the disk and poked a piece of twine through the two holes to make a wide hanger. Then we hung the ice medallion in a tree and watched the winter sunlight sparkle through it.

I think we’ll try this again sometime with pretty yarn in a coil.

IMG_0016

Of course, this pretty piece of nature art didn’t last long. Perhaps if you live in a colder climate the ice medallion will stay longer?

Another Sixth Birthday Gift: Earthbender Costume

My new baby: Janome New Home Christmas present from my mom and dad.

My parents bought me this awesome sewing machine for Christmas. It’s my third machine. I am still learning and I’m kind of hard on them. (For the record, two of my sewing machines work and one of them is a perfect learning machine. I thought I might let Lucas take it for a spin.) But this new one—this Janome New Home—is all mine. (Besides, Mom gets nervous whenever I go near her Bernina.)

pieces

Back in December I conceived of giving Asher an Earthbender costume, inspired by one of our family’s favorite shows, Avatar the Last Airbender. Asher has always been fondest of the Earthbending skill, and when he plays at “bending,” he is always an Earthbender. Maybe it’s because green is his favorite color. At first, I thought this costume might be a Christmas gift, but then I realized it was more appropriate for his sixth birthday.

So I bought a mini gi. (Actually, I bought two. The first was too mini.) I know my limitations and I realized I could spiff-up a gi more efficiently than I could make one from scratch.

Dyed Earthbender Costume in Progress

I spent a day last week dyeing the top green and the pants and belt a taupe color. Pale yellow would have been nicer, but that wasn’t an option when buying dye.

IMG_4062

My mom and I carefully picked out some fancy trim, and last night I got my new sewing machine out and put it to use. I even changed the needle to a denim one, to go through all the layers of the gi edge! I read the manual and everything! Amazingly, my boys slept through my sewing.

IMG_4064

I cut off the sleeves and sewed on this gold and green fringe. I wanted the costume to look like a cool martial arts gi, but not exactly like a karate uniform. I have one day left before Asher’s birthday gift will be presented to him. I’m presently debating about whether to use the sleeves I cut off to make wrist bands or a headband. I hope to decorate this final item(s) with the Earthbender symbol.

150px-Earthbending_emblem

Today I spent the morning in Asher’s kindergarten class with him, to help celebrate his birthday at school. His teacher told me that yesterday she asked him what he wished for. He said he wished for infinite wishes, and for a closet full of costumes. A CLOSET FULL OF COSTUMES!

Maybe I actually have made him the right birthday gift. … Or maybe he won’t wear it at all. That’s also a possibility. If he does like it and wear it, I’ll be sure to get a photo.

Anyway, there’s just one hour left in this Circle of Moms Top 25 Creative Moms contest. Here’s the button to vote for me. My gratitude goes out to all the wonderful friends and readers who have voted for me daily over the last two weeks. Thank you for the support and for helping me get into and stay in the Top 25! Voting closes at 4 p.m. PST on 1/30.

Thanks again!

Snowflake Fairies Tutorial

Snowflake Fairy with Face

In between chilly outings, when we’re inside warming up, is a wonderful time to appreciate the beauty of winter. Paper snowflakes are festive and look lovely decorating windows and our family cuts beautiful snowflakes every year.  Here is a project for making lovely snowflake fairies to flutter and dance in the air. Hang them over a heating vent to see them blow about, just like a real, falling snowflake.

Note: Some Waldorf educators recommend that you not make needle-felted figures and animals in the presence of young children, who may find the action of repeatedly needling the woolen bodies to shape them somewhat disturbing.

Materials

Materials

  • coffee filter
  • chenille stems
  • needle and thread
  • scissors
  • wool batting
  • needle-felting needle and pad

IMG_9664 IMG_9665

Start by forming the skeleton of your fairy. Cut your chenille stem in half. Twist a loop into the center of one half; this is your fairy’s head with arms attached. Fold the other half over (body and legs). Then put one leg of the folded chenille stem through the loop. The two pieces are now interlocked. About an inch farther down, where the pelvis of the figure would be, twist again to make two legs. You should now have a wire “stick figure” like you see in the right photo above. Fold the smallest possible bit of wire over at the end of each limb, to form tiny hands and feet and keep the cut wire from poking anyone.

IMG_9666

Take a small bit of wool roving, roll it into a ball, and insert it into the loop of the figure’s head. Then wrap a bit more roving around the head and begin to needle it in place into an attractive head shape.

IMG_9668

Using very small bits of wool, wrap around the figure’s body and arms. I find making a crisscross of wool that goes from shoulder to waist in both directions to be a good method. Needle this wool until it’s firm and stationary. The fairy’s arms may need more needling than the body to make them graceful and slender.

IMG_9677

Now add a bigger fluff of wool to create a woolen petticoat. You can either allow the fairy’s feet to show below the fluffy skirt, or make the skirt extend below the feet.

Cut

Fold a white, circular coffee filter into quarters or eighths and cut a snowflake. Cut a very small tip off the snowflake and unfold it.

Snowflake

This is the only tricky part: Gently guide your fairy’s head through the center hole in your snowflake. Go slowly to avoid tearing the paper. If the head won’t fit through the hole, refold the snowflake and cut the tip just a tiny bit more to widen the hole and fit the head through.

Snowflake Fairy in Progress

You have a choice now. You can either put the fairy’s arms through holes in your snowflake (if you have such holes) to make a dress (see above), or you can gently move one arm at a time up through the neck hole of the snowflake to make it a skirt instead of a dress. This part is not unlike carefully dressing a small child, except your fairy will wiggle less.

IMG_9680

Next, use another chenille stem and form a circle. Twist the two ends together to seal the circle. Then twist the circle into a figure eight. These are your fairy’s wings. Use a bit of wool to tack the wings onto the fairy’s back. Now give your fairy some white hair, and allow it to flow over the center of her back where the wings meet the back.

Snowflake Fairy with Belt

If you made a dress, you might wish to belt it with a ribbon, bit of string, or a braid of wool roving.

Snowflake Fairy with Up-do

Here is a fairy with a skirt. You can give your fairy a fancy hairdo, if you like, by coiling wool into a bun and needling it onto her head. You can also add a face using tiny bits of color needled in for eyes and a mouth (as seen in the top photo). The fairies are adorable either way.

Snowflake Fairies

Now, you can make more snowflake fairies and hang them near each other to dance in the air, or display them with other snowflakes.

 Snowy Garland wih Snowflake Fairies

Please vote for Love in the Suburbs at the Circle of Moms Top 25 Creative Moms blog list. You can vote once per 24 hours until Jan 30, and you can vote for more than one blog on the list! Thank you!

Valentine Ideas

In this post I’m going to share with you a few links to some beautiful Valentine ideas and craft tutorials. I figure that late January is the time to start thinking about making Valentines if you have class sets to make. If you’ve got more than one child in school, and about 30 classmate for each child, well, that’s a heck of a lot of love that you have to create before Valentine’s Day!

I’ll start with a few of our own projects.

Valentine Stones

Here is an easy way to use up any fabric scraps you might have lying about your sewing basket: Valentine Stones. I made these for my family but they could be for classmates, too. Each stone has a fabric heart on one side, with a message of friendship on the other.

Spin Art Valentine's Day Cards for Lucas's Classmates

These Spin Art Valentines were created using a Spin Art painting toy. These are a little labor-intensive if your child is young. But the results are quite beautiful and each one is unique. I didn’t write out a full tutorial for these, but I think you get the idea from the photo. Spin the paint. When paintings are dry, cut out hearts or butterflies. Glue them to cards.

I’ll spare you the Crayon Heart Valentines. They’re all over the internetz. They are fun to make, though.

Watercolors on Coffee Filters

These Rainbow Valentines are painted coffee filters. They are easy even for the smallest children to make. Simply paint three or four colors of Stockmar watercolor paints onto painting paper or coffee filters. Allow the paintings to dry on a flat surface. When they are dry, cut paintings into smaller pieces, if necessary, and then fold each one in half and cut a heart shape. Add the child’s name to the back or a simple message, such as “You warm my heart.” Older children can embellish the fronts of their rainbow hearts with some glitter glue, or sew them onto colored cardstock with a needle and embroidery floss to make lovely Valentines.

Third Grade Valentine Tree

Make a Valentine Tree and decorate it with beeswax hearts! Use pink, red, and white modeling beeswax to make pretty heart ornaments. Warm the beeswax in your hands or place in a pot of warm water for a few minutes to soften it up. Give each child a chunk of softened beeswax and ask them to make a heart. It can be solid, or just an outline, one color or several. Thin “snakes” of beeswax can be braided together and then formed into a heart shape. As the wax cools, it will stiffen and keep the shape you make. Poke a hole in any solid hearts. Add a ribbon or yarn loop for a hanger and then hang all the pretty hearts on a bare tree branch in a vase.

My Boys' Valentine Pillow Sachets from Mommy

I made these little Valentine Pillow Sachets for my kids one year. They are wool felt and stuffed with wool batting, lavender flowers and some essential oil. My boys keep these little pillows in their beds. And although they do get lost among the bedclothes, when they are found again my kids always take a long sniff. Even after several years, they still smell great. An older child can practice handwork skills by making one of these for a best friend, perhaps.

SAM_1604

Here is a great tutorial for shaved crayon hearts (suncatchers?) by my friend Marcy at A Simple Life. I’m very tempted to do these this year. I think these look great in the window.

Heart Baby

Eileen at Little Acorn Learning shares a sweet Little Heart Baby tutorial here. This little doll would be a perfect gift for a child or a teacher, and would make a charming addition to a classroom or home nature table.

Borax Crystal Snowflakes

upload

It’s January, so that means snow, right? Well, it does mean snow in lots of places, but not here in Northern California. So, we usually make our own snowflakes to brighten what inevitably becomes a month of fog and rain and mud. These snowflakes are made with Borax laundry booster (sodium borate) to add an ice crystal texture and shine. It takes a few days to make these.

Materials

  • white paper or coffee filters
  • scissors
  • Borax laundry booster
  • plates
  • boiling water
  • needle and thread

Tutorial

Start by cutting out your snowflakes. I tend to love very lacy snowflakes, but for this project I suggest you leave some nice solid areas. My son Lucas theorized that small cuts were better for these, and he may be right.

January upload

Boil a little water on the stove. Pour it into a glass mixing bowl and then add Borax until it will no longer dissolve into the water. When you see some borax sitting as a sediment in your bowl, you know your solution is right.

Place each snowflake on a dinner plate. Pour a little of the Borax solution onto the plate—just enough to cover the whole snowflake. Now you wait.

upload

The Borax will start to crystallize on the paper and plate. As it dries, the water will become clearer. You can gently pour off the excess water to speed the drying process. Allow the snowflakes to dry completely, the very carefully pry them up off the plate with a butter knife.

IMG_3852

Some of the Borax may fall off, but most of it will stick to the paper. With your needle and thread, sew a few stitches at the top of your crystal snowflakes and then hang them in the window where they sun can glint off their crystals.

IMG_3857

Enjoy!

Our 2012

2012: The year that featured plenty of Big and Scary and Sad. I learned so much this year and I am grateful for all the opportunities and lessons it brought, although I often didn’t like learning them. I’ve watched us dig deep and come out older, wiser, and sadder but with a greater capacity to love.

mosaic 2012

Plenty of amazing and beautiful things happened, too. When I look through photos from the year, I see so much color, so much light, so much adventure, so much growth.

I asked my family what were the best parts of 2012 for them.

Lucas’s Favorities:
He got to ride the biggest roller coaster on the SC Boardwalk and do the Haunted House for the first time.
This Christmas—“What part?” I asked. “The Christmas part.” I think he means everything about Christmas.
The world didn’t end. He’s glad about that.

Ian’s Favorites:
He finished his second Tough Mudder at Diablo Grande in the California Central Valley.
Our family trip to Santa Cruz in September, when we visited the Monterey Bay Aquarium and the Santa Cruz Beach Boardwalk with Ian’s brother Danny.
Both of our summer camping trips to Grover Hot Springs with our beloved Barbarians and DL Bliss State Park with our Waldorf school chums.

Asher’s Favorities:
His. Own. Legos. And playing Legos any chance he gets.
Being an “Older” in Kindergarten and all the great responsibility that entails.
Playing D&D with Daddy and Brother. Playing with Solstice dog.
“Writing books. Annoying my brother. Getting presents from Santa.”

My Favorities:
Watching Lucas play Thor in the spring fourth grade play and Hanuman in the Ramayana in the fall.
Painting, especially my landscape class and how challenging it was.
Writing e-books and publishing festival e-books with Eileen at Little Acorn Learning.
I am closer now to some friends than before and that feels wonderful.
Celebrating so many lovely holidays with my family. Creating joy and memories.
My birthday wine-tasting excursion with my friends.
Family Clay Camp with my kiddos in the summer.

Happy New Year! May you find new richness in the everyday, new opportunities, new friends, and new delights in 2013. May you find peace and laughter, forgiveness and love for self and others.

  • About Sara

    Thanks for visiting! I’m Sara, editor and writer, wife to Ian, and mother of two precious boys. I am living each day to the fullest and with as much grace, creativity, and patience as I can muster. This is where I write about living, loving, and engaging fully in family life and the world around me. I let my hair down here. I learn new skills here. I strive to be a better human being here. And I tell the truth.

    Our children attend Waldorf school and we are enriching our home and family life with plenty of Waldorf-inspired festivals, crafts, and stories.

    © 2003–2018 Please do not use my photographs or text without my permission.

    “Love doesn’t just sit there like a stone; it has to be made, like bread, remade all the time, made new.” —Ursula K. LeGuinn

  • Buy Our Festivals E-Books


  • Archives

  • Tags

  • Categories

  •  

  • Meta