Love Is …

First time in months #painting #oils #art #learning

  • Ian buying me new windshield wipers and installing them, and fixing my rear brake light because he noticed it was out.
  • Lucas making rock candy at home because he learned how in chemistry class!
  • My Daddy.
  • Friends who trust and follow you into the fire, then lead you safely out again.
  • Meal planning and thinking about all the good food to put into all the good people I love.
  • When my guys give me gratitudes to write in our gratitude journal, even though they’d rather not.
  • Heavy whipping cream in my coffee.
  • Friends who make a special point to walk together on their rare day off.
  • Painting for the first time in 9 months. I love it so! Why the hell don’t I paint more often?!
  • Forgiving myself for not painting more often.
  • Buying all-new concert dress clothes/shoes for my boy for Thursday’s fall concert, and hoping-hoping-hoping they will still fit for the spring concert—or if not then, at least for next month’s winter concert.
  • VoVo’s consistent and helpful babysitting.
  • November, ablaze with fall color, and roses blooming too!
  • My sunny boy with Shaun Cassidy hair.
  • Reading about adventuring hedgehogs with my sunny boy.
  • Parent-teacher conferences.
  • A fluffy dog who is always ready to clean your paws for you.
  • 5k Fun Run for my moody son, who benefited from it even if he didn’t think it was all that fun.
  • My grandmother and my grandaunt, who have passed away. I miss them very much right now.
  • Ian reading The Golden Compass aloud to us, after reading more than 5,000 pages of Harry Potter to us this year.
  • Lyra Belacqua herself. Because boys need girl heroes too.
  • Pulling out beloved, ancient comic books for Lucas to read.
  • Friends who cook delicious meals as a way to celebrate their birthday with guests.
  • Trusting and watching a new chapter unfold.

Elf Quest #comics #12yearold #seventhgrade #son

Still Painting

Not sure what else to do... maybe if I mull it over a while I'll have a breakthrough moment.

Well, I managed to paint a painting in July. I wish I could carve out more time for this. I SHOULD carve out more time for this. But then again, I SHOULDN’T let painting—which I LOVE—become another Should in my life. Tricky balance there, see?

IMG_7258

OK, anyway, I took this photo (above) of Wrights Lake in the El Dorado National Forest and I liked its simplicity and shapes. I liked its colors, too, and I thought it might translate nicely into a painting. You know, if I could paint it. So I tried.

It's coming along. Think I've corrected a couple of problems. I think I see some more.

This top photo is where it was after a couple of hours. I’ve put these phone snapshots into this post even though they are not good pics because I like to be able to see where I started and how the painting moved forward. Each stroke changes the whole. Each decision takes you farther along in the painting. I am usually making these decisions with my gut, and less with my head. But my head really wants to know WHY I’m deciding what I’m deciding as I paint. (I SHOULD go back to class.) I hope that I am improving the painting as I work on it. But sometimes I am not too sure.

I still struggle with putting in too many lights too early. I still struggle with translating a photo into a painting; I don’t really want the painting to be photorealistic but I do very much want what I’m painting to be recognizable, to look real. You might say that I don’t trust my ability to render my subject. I’m still learning about how light works and moves, so I try to replicate what I see faithfully. I don’t know if I know enough to invent. I want to learn to let the painting be my interpretation, to be my expression of a scene or a mood. I want to learn to use the paint to communicate emotion and not just “I was here.”

IMG_7706

So. Here is where my painting stands now. I’m calling it finished. I signed it. I like certain things about it; parts of the water are working, I think. I dislike other things. All those qualities I want my paintings to have—well, I have to keep painting to get there.

IMG_7705

And if I want to keep learning and getting better, I have to get this one off my easel so I can start something else.

Making art is hard.

Making art is scary.

Keep making art.


Summer Solstice Celebrating and Feasting

Seagulls

Sunlight is flooding
The widths of space
The son of the birds echoes
Through the realms of the air
The blessing of plants sprouts
From the being of the earth
And human souls lift themselves
In feelings of thankfulness
To the Spirits of the World.

—Rudolf Steiner

IMG_7106

Happy Summer Solstice! Here is a little tea concoction I made and it was so yummy, we’ll definitely do this again:

  • two green tea bags
  • lemon slices, squeezed into the water
  • lemon balm leaves
  • sweetener of your choice

(Steep all day, strain, and then chill before drinking.)

We have had a marvelous day and I hope you have, too.

Forming the Giant Cookie

Summer Sun Mosaic Cookie Before Baking

We made a giant summer sun mosaic cookie together. Here it is before baking. And here is the basic giant cookie recipe from Mel’s Kitchen Cafe. This kind of thing goes over really big with my children. Lucas made the face; Asher did the eyebrows and the sun rays around the outside. Since the boys got soooo excited about putting the Reese’s candies on top, I realize now that I didn’t need to put peanut butter chips into the dough.

IMG_7131

IMG_7141

We painted suns, inspired by my co-author and friend Eileen Straiton’s project in our Midsummer Festival E-Book. I think once they’re dry we’ll hang them.

IMG_7149

IMG_7147

IMG_7148

IMG_7157

Then we had a beautiful Solstice feast of shrimp tostadas and several fresh salads. I needed lots of circles and colors and fresh veggies in this meal. We even added in some nasturtiums from our garden. We had so much gorgeous food, I wished we had guests to share it with! This is one of my favorite things: Eating amazing California food outside in summertime, when the day has been hot but the evening delta breezes pick up just in time.

IMG_7158

“Give me the splendid silent sun with all his beams full-dazzling.” —Walt Whitman

Solstice in a Sunbeam

Also, today marks six months since our little dog Solstice came to our family. He followed our boys home on December 21 and hasn’t left our side since then. We love him so much, and we’re all grateful to have him.

Here’s to unexpected blessings that follow you home and take up residence in your heart.

Here’s to abundance of joy, nourishment, learning, and opportunity.

Here’s to family traditions carefully conceived and simply crafted.

Here’s to courage, doing good, and generosity.

Blessed Be.

Plein Air Painting and Iris Farm

My Landscape Choice: Plein Air Painting Workshop at Iris Farm

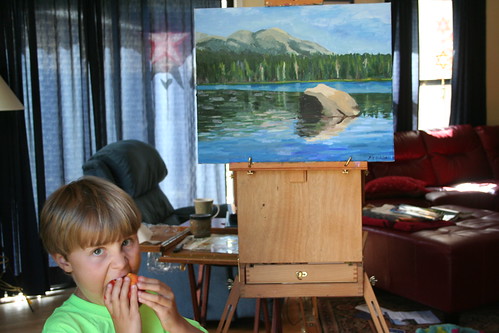
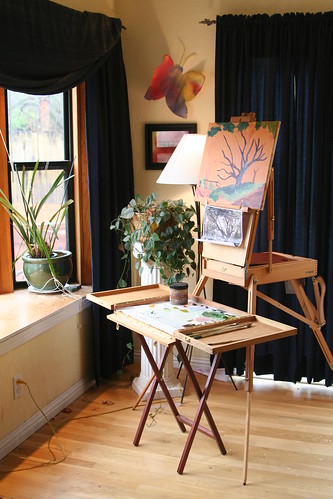
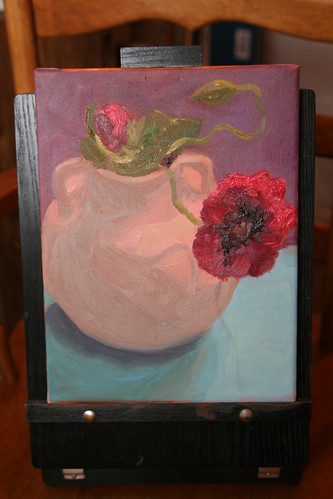
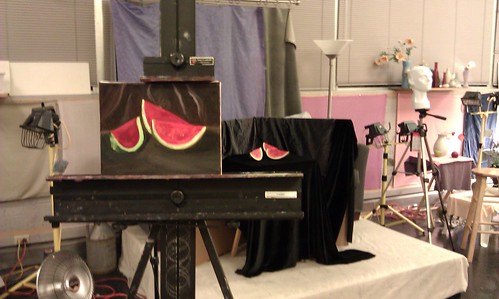
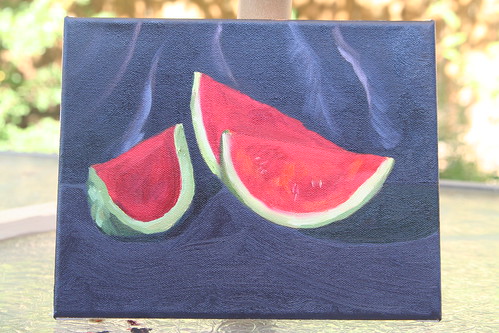
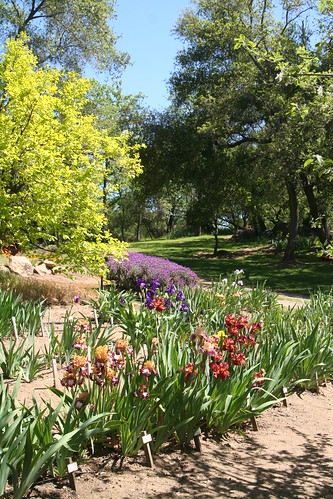
Back in April I got to spend a half a day doing something amazing. I attended a plein air painting workshop taught by Randy Blasquez at the Horton Farm Iris Garden in Loomis, California. The view above was my chosen landscape and I attempted to crop it down to a 12 x 8 canvas and just show the middle part. The day was warm and gorgeous, and I prudently parked my easel, Anaïs, in the shade. Something about that chartreuse tree, the lavender in the back, the dark right side, and the red-orange irises in the foreground was very attractive to me.

My Friend Jonathan Iris

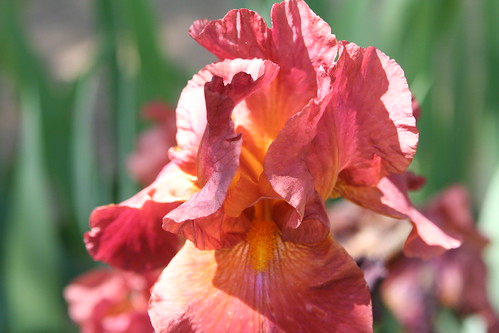
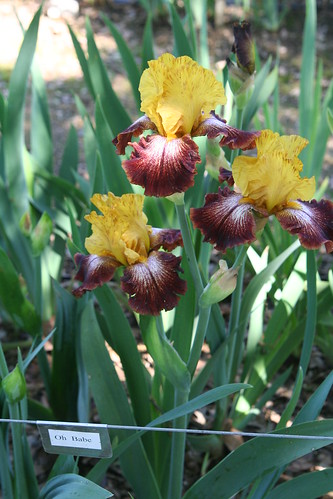
Maybe it’s because these were named “My Friend Jonathan.” Jonathan is my brother’s name.

Plein Air Painting Workshop at Iris Farm

We spent about an hour or so watching our teacher Randy do a demonstration after we arrived that morning. Then we all fanned out and found our spots. I found myself struggling with wanting to paint, but also wanting to walk around and admire the irises and take photographs. I buckled down and painted for about two hours. Then I allowed myself to wander just a bit before rushing back to work on an editing project at home.

My painting from that day isn’t good, isn’t finished, and I don’t care much for it—except that I learned a lot in painting it. I learned that simpler is better, when it comes to landscapes—at least for a beginner like me. I learned that the point of painting outside is to capture colors and shapes. That the light will change while you’re painting, and your painting won’t look much like the landscape does at the time you stop. Also, I learned that my eyes worked really hard at adjusting between seeing the landscape in sunlight and seeing the painting in the shade. By the end of the day I was a trifle sunburned and my eyes were sore.

Iris Farm

No matter, though. It was a glorious day. And maybe someday I’ll work on that painting some more. Bring in more light, darken the bare ground with a warmer brown, etc. Maybe.

Mariposa Skies in Foreground

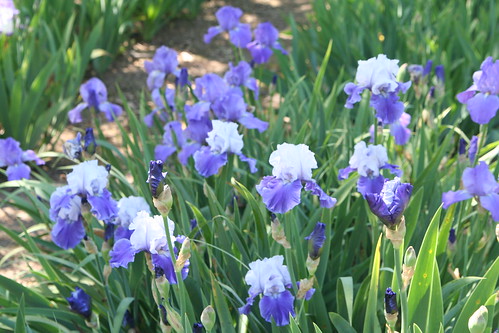
Light-and-dark blue “Mariposa Skies” was so lovely.

IMG_4126

IMG_4121

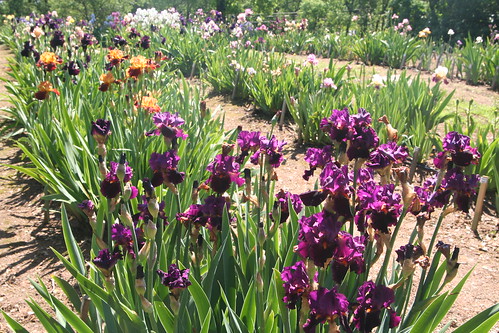
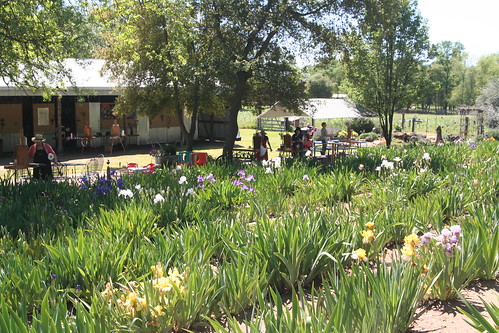
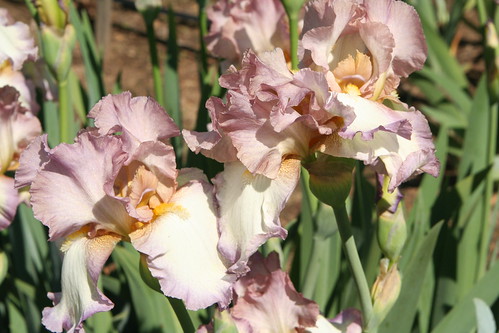
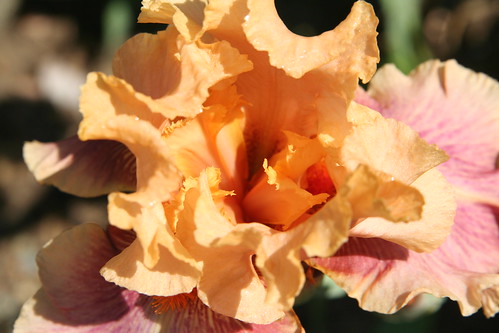
The farm is gorgeous in every way. Rows upon rows upon rows. I bought three irises in gallon pots that day to add to my garden: “Widdershins,” “Smoke Rings,” and “Obi-Wan Kenobi”—how could I resist? All of these are rather unusual colors for irises, which suits my garden just fine. I didn’t really have to be too choosy anyway; so many were gorgeous.

IMG_4076

I liked this place so much I took my mom there the following weekend. No painting that time, although they were having an event for painters that weekend.

IMG_4096

Mom and I just enjoyed wandering and admiring and iris shopping.

IMG_4083

IMG_4112

IMG_4093

IMG_4179

Surprisingly, Mom was attracted to all the purple irises that day, instead of the yellow ones. Yellow is her favorite color.

IMG_4157

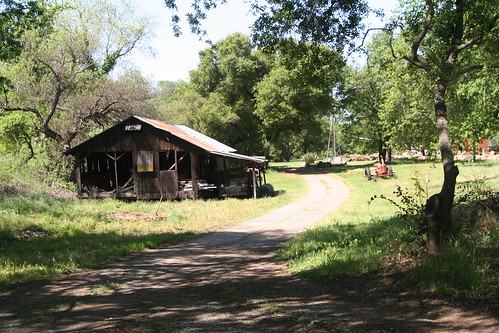
Oh, and there were super-cute goats. And a lizard. And a bunch of rusty old farm equipment! And a rundown barn. Truly a delightful place.

IMG_4171

IMG_4139

Painting Is Wonderful

Magnolias Oil Painting

It’s been a little while since I posted about my experience of learning to paint with oils. I’m finishing my third set of studio classes now.

This is my biggest painting yet—a 16 by 20 canvas. I used my photograph of my neighbor’s magnolia blossoms as a reference. I am very pleased with how this came out. I tried to paint quickly and with emotion. I allowed the underpainting to show through for the first time in the hopes that it would lend a dreamy kind of atmosphere. I see a couple of things about this that I would like to fix, but I think it’s basically done. I think I’ll even sign this one.

Magnolia Painting in Studio

I’m really enjoying my teacher, Randy Blasquez, and my classmates. I’ve now been coming to class long enough that I’m getting to know other painters and see and learn from their processes, too. Everyone is different. Everyone struggles with different aspects of painting. Each subject we attempt has its own challenges. I love tackling new things, and I feel I’m learning with each painting I do.

Painting at Home

I’ve done a very little bit of work at home, which was very fun. My new easel, whom I named Anaïs, and my new “French Mistress,” whom I named Genevieve, are working out really well. Genevieve is a wood palette box that holds my glass palette and keeps paint from getting everywhere. These gizmos are beautiful and functional. I waited about six months before investing in these items. I think I had to prove to myself that this painting this wasn’t a fly-by-night whim.

Damaged Painting

This is a shot of my slightly damaged painting I did in class back in February. Some “helper” seems to have dragged a little finger from the dark center of the poppy down into the pot and the blue of the tablecloth. I’ve managed to take out most of the line with some very careful scrubbing, but I still have to repaint part of the poppy. I like this painting, too. I like the shadows especially. While working on this painting I was consciously trying to use more paint. That probably sounds funny, but I have a tendency to be conservative—oils are pricey. I wanted this painting to have more flow and texture.

Last Friday I got to go to a plein air workshop. It was my first experience painting landscapes outside. I’ll write about that another time. For now, I’ll say it was amazing and fun—and full of new challenges.


St. Patrick’s Day Paper Ornaments Tutorial

St. Patrick's Day Paper Ornaments

We are sick. Well, Lucas and I are, and we spent the day at home. This afternoon we rallied a bit and managed some impromptu crafts for St. Patrick’s Day. So, these kid-friendly St. Patrick’s Day paper ornaments were born. I offer these in the spirit of using what you have on hand for some low-key fun.

Materials

  • 2 paper plates
  • watercolor paints and brushes
  • watercolor paper (optional)
  • scissors
  • ribbon or yarn
  • compass and hole punch (optional)

Tutorial

St. Patrick's Day Paper Ornaments

Insert your scissors into a paper plate and cut along the outer ring and cut out a shamrock shape from the center of the plate, leaving the bottom of the shamrock’s stem attached to the outer circle. I cut out a three-leaf shamrock and a four-leaf. If you get ambitious, you can cut out the figure of a standing leprechaun, leaving both feet and one hand attached to the outer circle. This is harder to do, but give it a try. You can choose to draw your design on the plate first, or just eyeball it, start cutting, and see what happens.

St. Patrick's Day Paper Ornaments

Now get your kids to paint your design. Painting is such a great activity when you need to rest or cultivate calm in your home.

St. Patrick's Day Paper Ornaments

If you have the type of paper plates with a coating on them to make them less absorbent, then you will probably also want to paint a circular background on watercolor paper. Do you know where your compass is? If you have one, it makes this step a lot easier. Draw a circle that will fit inside your paper plate. I painted rainbows on some circles to use as backgrounds. I love rainbows.

Lucas Painting

Your children should also paint the back of a second paper plate. Be sure to wait until all the watercolor painting is completely dry before you assemble your ornament.

St. Patrick's Day Paper Ornaments

With hot glue, glue your circle background into your bottom plate. It will cover any design on the plate and compensate for that water-resistant coating.

St. Patrick's Day Paper Ornaments

Like so. The design that is still visible around the edges won’t be visible in a minute.

St. Patrick's Day Paper Ornaments

Now stack your front cut-out design on top of the bottom paper plate. Using hot glue, seal the outer edges together. Press them firmly to make them stick nicely. You might have to apply glue in six or seven spots around the circle.

St. Patrick's Day Paper Ornaments

Finally, punch a hole in the top, thread a piece of ribbon or yarn through the hole, and hang your ornament.


At Home

Detail: Unfinished Oil Painting

I don’t have enough website savvy to go dark today in protest of PIPA and SOPA legislation, but I can encourage anyone who happens to stop by here today to oppose it. Go here https://www.google.com/landing/takeaction/#utm_source=googlesem&utm_medium=cpc&utm_campaign=signup or here http://americancensorship.org/ to sign petitions to stop internet censorship.

Erector Set

In other news, things are chugging along here at home nicely. While I went to painting class last night and worked on the painting you see above, my fellas all stayed home and had a great evening together. They got out the erector set and built robots and mechanical whirligigs for fun, played with Legos, and read some Winnie the Pooh together. This is made of win-win. My painting isn’t finished so I get to work on it again next Tuesday.

Tag

The little dog Solstice is now officially a member of our family. Ian bought him a tag and took down the signs. He has settled in so beautifully it’s really no surprise. He is exceptionally mellow and does a lot of sleeping and snuggling all day and all evening.

Solstice at Home

But he’s always ready to play and prances about in a very sprightly manner. He doesn’t like to be left home alone so we take him along as often as we can. This morning he bounded into Ian’s car to go to school with the boys. We had to remind him he was staying home with me today.

Babies Asleep

And this is about as cute as can be. He barks once or twice when someone approaches the front door, and at this moment is lying on the couch grumbling because the yard guys are here. But he greets everyone with great friendliness and seems to be happy here.

I’m working, but not too much. The kids are healthy. I should be planning Asher’s birthday party but so far I’ve not really gotten anywhere with it. He wants a jungle birthday; last year he had a jungle dragon birthday, so I’m not sure what to do differently. Certainly our garden doesn’t look very jungly at this time of year. It’s bare and a little frost burned.

January Home

January Home

January Home

January Home

January Home

I went looking for some places of peace and quiet around here and this is all I found. There are heaps of laundry to do and Legos all over the place. It’s an endless stream of chores. And while I’ll soon go and do some of them, I feel pretty good about stopping in here to write a bit just the same. Life is good and I get to enjoy it.

Painting: My Copper Kettle Studies

Copper Kettle Study 1: Payne's Gray and White Only

In mid-November I went back to my painting class after a two month hiatus. I had to earn some dough before I could return to class. In the time that I was away from it, my stress levels soared, I got depressed, and things looked bleak. I’m not saying all of this was related to not painting—there was plenty of other stuff going on. But I remember thinking during all of that, I just want to paint. I yearned for it. I decided for the sake of my mental health that continuing my classes was good for me.

And it is. I’m now three more classes in and I’m still loving it. This is a series of three paintings of a copper kettle. The first was the black and white one above. We were instructed to use only Payne’s gray and white. The point of the study was to focus only on value and not on color. I have a lot to learn about this, but value is the relationship of dark and light. With the two paint colors I mixed a middle gray, then a light gray and a dark gray.

Color Wheel

Modern Color Wheel from My Class

Goethe’s Color Wheel (for Fun and Because It’s Pretty)

After Thanksgiving we were given a new exercise: Paint the same subject in basically the same position on the same background using complementary colors, which are opposite on the color wheel. When mixed in equal proportions, they should create a neutral gray. I’ve learned that in painting “gray” is not so specific a shade as it is in my mind. There are lots of grays and, well, isn’t that wonderful?

Copper Kettle Study 2: Viridian and Red Orange Only

This second study above was painted with a blue-green and a red-orange. All the colors you see were mixed from those two and then tinted with white to ultimately fill my palette with 15 different colors. My kettle wasn’t in the exact same position as in the first study, but the effect is the same. (I just noticed there is a diagonal shadow in the bottom right corner of these photos. That’s not in the painting; it’s in my window and the photographs.)

Copper Kettle Study 3: Triad of Orange, Sap Green, and Violet

This one is last night’s study: same kettle, different exercise. The point of this study was to use three colors from the color wheel, a triad. (A color scheme in which three colors of equidistant distribution on the color wheel are used, e.g., red, blue, and yellow.) We could pick any three, so long as they had the right relationship to each other. I chose green, orange, and violet. I mixed and mixed these three colors and then tinted with white to get roughly 17 colors on my palette. Just doing this was awesome. I also had three goals in mind when I was painting this third kettle study: 1) paint a little faster, 2) paint thicker (use more paint), and 3) take more risks.

Now, this copper kettle isn’t exactly the thing I want to have a painting of in my home, much less three paintings. But this was a fascinating exercise and I’m so glad I did this. I have a much greater appreciation for color and mixing than ever before. Also, I no longer feel that every painting has to prove anything. The doing of it was the thing.


Dragon Bread for Michaelmas

Dragon Painting by Lucas

Lucas’s watercolor dragon painting, which is on display in our home.

Today is the official Feast of Saint Michael. Michael was the archangel who threw Lucifer out of heaven. It is Michael who sends us courage to fight the good fight, to face up to dragons and monsters in ourselves and our society, which seems so very necessary in these difficult times. How do you meet on the battlefield the dragons of fear, hate, greed, and bigotry? What will you do to celebrate and conjure courage and goodness?

Dragon Bread Recipe (3rd Grade Cooking)

Last year in school, Lucas’s third grade class made dragon bread and they copied the recipe into their cooking main lesson book. I’ll translate and fill in the gaps:

DRAGON BREAD

2 1/4 teaspoons yeast

3 3/4 cups  flour

3/4 cup warm water

2 eggs

1/2 cup oil

1/2 teaspoon salt

1/4 cup sugar

Mix together the yeast and warm water. Let it rest. In another bowl, mix eggs, oil, salt, and sugar. Add flour. Add yeast and water mixture and mix until blended. Knead the dough on a floured surface until it’s firm and smooth, then round it into a bowl coated in a little oil. Turn the ball over once to coat both sides of dough with oil. Let the dough rise in a warm place until it has doubled in size. Now place your dough on a greased cookie sheet and shape it into a dragon. You can use scissors to cut legs, a mouth, scales, etc. Poke in almonds for teeth, or dried fruits for spikes,  if you wish. Cover and let your dragon bread rise again for about 30 minutes. Bake at 350 degrees until done. Devour with righteousness!

The First Dragon Bread to Be Eaten for Michaelmas Dinner

Of course, any bread recipe you like will work just as nicely. Yum!

Painting

Oil Painting in Progress

I had my “final” painting class on August 23. We worked on a still life of watermelon on a table draped with black velvet fabric. I tell you, painting black velvet was really tricky for me. Is it green-black? Purple-black? Mixing blacks from transparent ultramarine blue, alizarin crimson, and thalo green was quite remarkable. I painted a small 8- by 10-inch canvas that night.

Third Oil Painting

A few days later, while the paints on my palette were still wet, I finished it at home. I elected to work on that black velvet some more—it was looking wimpy—and to dull the green in the rind of one section of melon a bit more. Here’s a photo of the finished, still-wet painting. Such a simple, one-object subject, and yet it presented many challenges. It felt perfectly marvelous to use all those reds!

Above, I said “‘final’ class.” I have to enroll in another session because I’m not done with this yet. I’ve taken a haitus of a couple of weeks now and I and really miss it. I’m hoping to return to class next Tuesday.

To all of my darling friends who made it financially possible and shoved me into this dream of mine (because I wouldn’t go there otherwise), thank you. Thank you from the bottom of my heart. I’ll never forget this birthday present.

  • About Sara

    Thanks for visiting! I’m Sara, editor and writer, wife to Ian, and mother of two precious boys. I am living each day to the fullest and with as much grace, creativity, and patience as I can muster. This is where I write about living, loving, and engaging fully in family life and the world around me. I let my hair down here. I learn new skills here. I strive to be a better human being here. And I tell the truth.

    Our children attend Waldorf school and we are enriching our home and family life with plenty of Waldorf-inspired festivals, crafts, and stories.

    © 2003–2018 Please do not use my photographs or text without my permission.

    “Love doesn’t just sit there like a stone; it has to be made, like bread, remade all the time, made new.” —Ursula K. LeGuinn

  • Buy Our Festivals E-Books


  • Archives

  • Tags

  • Categories

  •  

  • Meta