Happy Hanukkah!

IMG_3338

Hello!

I will spare you the details about how I’m behind on lots of stuff; it’s been a rough week. However, I’m feeling better and because of that my spirits are soaring! And all that stuff that’s piled up will get done eventually. More to come on Dickens Christmas Fair, tree hunting, St. Nick, and Santa Lucia.

Here is a post I wrote a couple of years ago, in case you’d like to make my Star of David window stars this week. Click the link for a detailed tutorial.

I’m wishing everyone a joyful holiday season filled with light, laughter, and peace on earth. Shalom.

Saint Martin Lantern Walk at School

Martinmas lantern walk #waldorf #sacramentowaldorfschool #7yearold #secondgrade

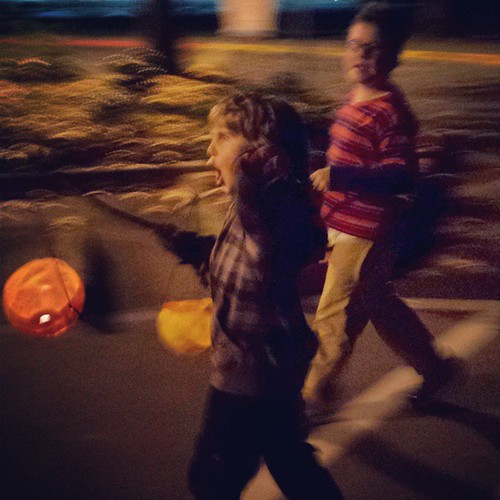
We had a wonderful time last night at Asher’s second-grade lantern walk. Our sweet teacher really wanted a mood of quiet reverence, and ultimately I think we got there, but the first few minutes of waiting for the event to begin were a tad wild. How often do large groups of 7- and 8-year-olds have the opportunity to play in the dark at their schoolyard?

When the teacher gathered the children together, they sang some wonderful songs for us. We entered the classroom, which was glowing from lantern lights atop the desks arranged all around the room’s periphery. The children sat on the floor and we parents gathered around the edges of the room. Teacher then told a beautiful story of Saint Martin walking through the cold, stormy night to reach the home of an old woman who lived high on a hill. The woman was ill and weak from hunger and thirst. Martin was bringing her bread and wine. But as the weather worsened, he fell on the path, and couldn’t see the way forward. He prayed for a light that might help him complete his mission to bring food to the ailing woman. A light appeared to brighten his way, and he was able to reach the woman in her remote home. He fed her from the loaf of bread, and gave her wine to drink. He was then amazed to see the old woman transformed into a healthy young woman, with the moon at her feet and stars about her head, who said that Martin’s way would always be lighted with the light of knowing, so that he might do his good works. And from then on, wherever the saint went, a little light was their to guide him. It became known as Martin’s lantern, and this is why we honor the saint with lanterns lighting the dark night on his feast day.

Or something to that effect. Probably Asher could tell us the story, word for word. But I’m old and I only heard it once, so … I looked it up, and it’s a story by Reg Down from the Tiptoes Lightly book The Festival of Stones.

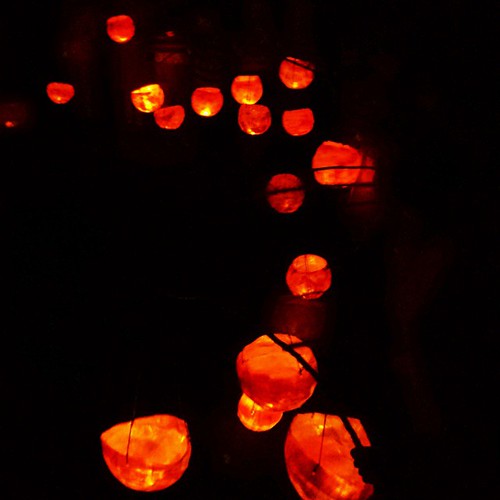
The lanterns were distributed to their young makers, and then we set out to walk through the dark school grounds, with the second-graders leading the way. Some parents and siblings brought lanterns as well, and the second-graders sang all along their walk. Their little voices are so beautiful! We walked past the classrooms and then into the farm, threading our way through the dark paths between fields of vegetables and greens, though the little orchard and out to the pasture on the bluff, where the sound of the San Juan rapids is loudest because it is just below the pasture—one of the most beautiful spots on the American River. I wish there had been a touch more ambient light for photos.

Don't take my picture

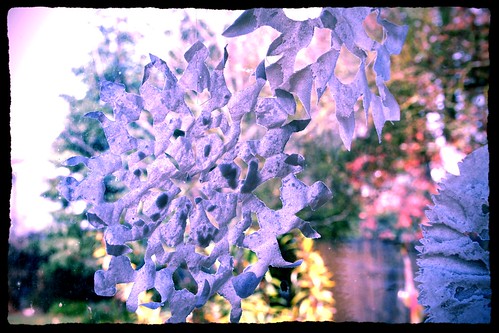
Asher enjoyed it, as did I, but he didn’t want me to take his picture. The second-graders made their lanterns by doing papier mache over a balloon, and then suspending the lantern from a carrying stick. They worked on these over three days at school.

Before we went, I made a really fast Martinmas lantern, in case Lucas wanted to use it. (Neither of my kids wanted to make it with me: Asher because he already made his at school, and Lucas because he’s too old, in his opinion. Saints are sooooo second grade, not seventh.) Oh well. The preschooler I gave it to to carry liked it just fine!
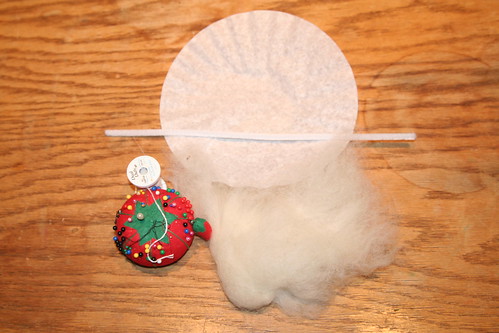
Materials

  • clean gallon milk jug
  • sharp knife
  • glue gun and glue sticks
  • autumn leaves
  • white tissue paper
  • mod podge and paint brush
  • tea light candle

Tutorial

20141111_155255

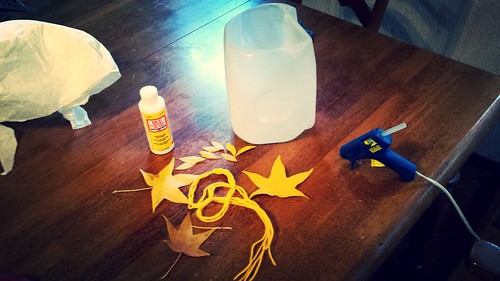
It couldn’t be simpler, really. Cut the top off the milk jug, leaving the handle in place, using a sharp knife like a steak knife.

2014-11-12_04-36-47

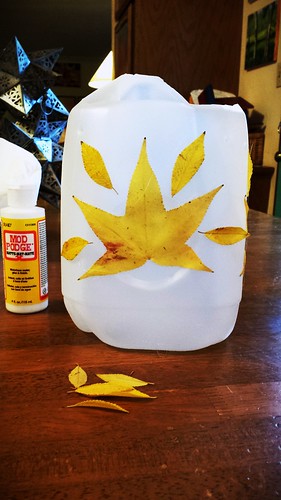
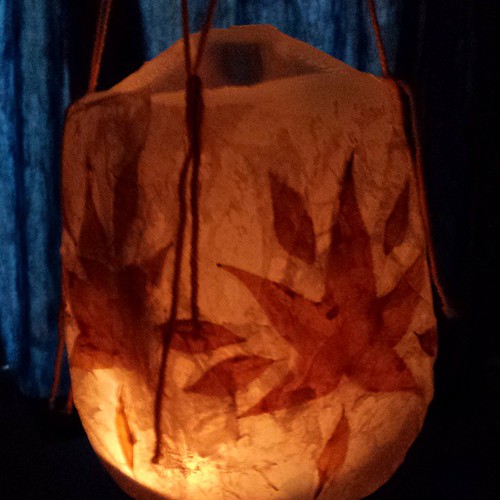
With a glue gun, glue on pretty autumn leaves in a pleasing pattern. Decorate all sides of the jug. A lighted tea light inside will make your lantern glow nicely.

2014-11-12_04-37-35

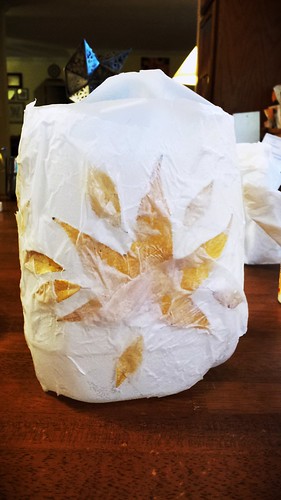
With torn pieces of white tissue paper, decoupage over the leaves and body of the lantern. You can use colored paper if you like. I wanted my leaves to really show through, so I used white paper. You don’t really have to do this step, but if you’d like your lantern to look less like a milk container, do this part. It will dry fairly quickly.

You can use the milk jug’s handle to carry your lantern, or you can add a yarn handle. Poke three small holes in the top of the lantern with your knife. Be careful not to put them too close to the very top edge.

Fingerknit three strands of yarn, about three feet long, to make a hand-width handle. The ends off either side of the finger-knitted section should be long. Thread the ends into the holes you pierced into the handle. Then tie them off, making sure the lantern hangs level from the yarn.

Happy Martinmas!

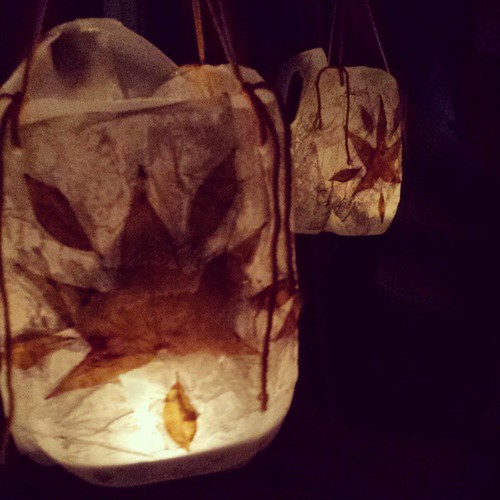
Finally, put a bit of hot glue on the bottom of a tea light candle and glue it down to the bottom of your lantern. This makes it safer. You don’t want your candle bouncing around inside the lantern.

New lantern for Martinmas #waldorf #waldorfhome #festivals #holiday #martinmas

So, how do you celebrate this darkening time of year? Do you do something special for Martinmas on one day, or do you make a week or so of it? Will you enjoy your lantern on many evening walks this fall? Remember it can be used more than just one night.

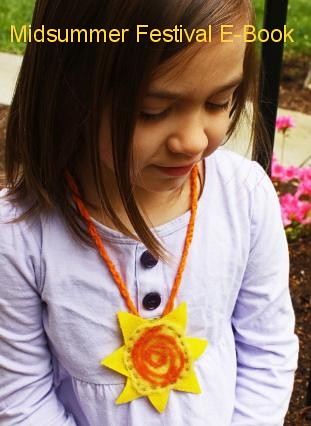
(More lantern-making crafts can be found in our Martinmas & Thanksgiving Festival E-Book.)

Tutorial: Making Leprechauns

Leprechaun Dolls for Asher and Lucas

Sew some clothes for bendy dolls to make them look like sweet Leprechaun friends. They make wonderful friends for your kids to play with this time year and older children can make their own with supervision. Or make leprechauns in secret and have them magically appear on the morning of St. Patrick’s Day!

Materials

* wool, wool-blend, or eco felt in various greens
* rope bendy doll body
* embroidery floss
* yarn or wool roving for hair
* white glue

Tutorial

Measure the doll’s body to get a sense of how long the shirt or dress should be. Using these measurements, draw a simple shirt or dress pattern on paper and cut it out. I recommend using generous proportions. Lay the paper pattern on a doubled piece of felt and cut it out. (Make trousers the same way, first drawing a pattern and cutting out the felt.)

Leprechaun Doll and Notebook for Lucas

For a waist band, simply do a running stitch around the top of the skirt or trousers. Pull it tight. For added security, you could glue the skirt or pants onto the doll’s wooden body.

No hemming is necessary with felt, although you can put a pretty blanket stitch along the bottom of a shirt, skirt, or dress to make it even more attractive.

You could even cut out a small shamrock shape for a decoration and sew it to the front of your doll’s shirt, skirt, or dress. Or embellish the front of the outfit with pretty embroidery. (I’m not good at that kind of decorative stitching.)

Leprechaun Doll and Notebook for Lucas

Untitled

Don’t forget to make a jaunty hat! Experiment with your felt and fold it to fashion a hat—any shape you like will do. I made one hat out of a half-circle of felt, stitched up the curved front so the top points backward. Another hat I made by folding a rectangle of felt to make two layers, then folding it around my doll’s head to make a cone, and sewing it along the top and back.

Glue hair, either yarn or wool roving, onto the wooden head and then glue on the hat. Your Leprechauns are now ready for gentle play.

Papercutting for 2014: Year of the Horse

Happy Chinese New Year: 2014 Year of the Horse! (I've been sick, so playing with paper is a good pastime.) #papercrafts #2014 #yearofthehorse #newyear #red #horse #snowflakes

I am a great admirer of the traditional Chinese art of papercutting. I think it is a simply exquisite art form. I have no idea how people do it, and no doubt that I’ll never achieve anything remotely like it. But I do love cutting paper snowflakes and I wondered if I could maybe come up with a design that looked like a horse, in honor of the 2014 Year of the Horse in the Chinese zodiac. Well, I know from years of experience trying to draw horses (from the ages of 6 to 13) that horses are not all that easy to draw. But, I tried my hand while recuperating on the couch, ill myself and with ill family all around me.

It’s fun, so you might want to give it a try. Fold a paper snowflake (half, half again, half again into a triangle). Then draw your horse design onto the top triangle with a pencil. You have to make several parts of the horse go all the way to the folded edges of the paper. This keeps the design connected.

For the red paper, I used a silk paper from A Toy Garden. It is delicate and very slightly see-through. It’s thinner than copy paper, so your shape will be easier to cut out. Red construction paper is thicker, and therefore harder to cut through multiple layers.

Year of the Horse: Happy New Year! #papercrafts #2014 #newyear #red #horse #snowflakes

Prototype. Not right yet.

Experiment with white paper first to perfect your design, if your red paper is precious. Honestly, I think it’s the red paper that makes this feel special when it’s all cut out. What can you come up with? Hang your papercut in the window. Good luck and Gung Hay Fat Choy!

upload

Tutorial: Patriotic 5-Pointed Window Star

IMG_7391

I am a freak for window stars. It’s been quite a while since I made any new ones, so I pulled out my kite papers and glue stick the other night. I wanted to make something red-white-and-blue to decorate for Independence Day, and five-pointed stars are always festive and patriotic in the U.S. Our family is almost never at home on this holiday, but crafting with this theme seemed like a fun thing to do anyway. If you are hosting a gathering for the Fourth of July (or for Bastille Day/La Fête Nationale in France on July 14), these would make lovely decorations. Make a bunch!

Incidentally, check out how many countries have flags made of red, white, and blue!

Materials

  • 5 sheets of square kite paper in red, blue, or white
  • glue stick
  • tape
  • ruler or straight edge for making crisp folds
  • large white piece of paper
  • protractor
  • pencil

Tutorial

IMG_7375

Fold your square into diagonals. Open it back up again.

IMG_7376

Now fold opposing corners to the center line (photo above). The top is now a horizontal fold that is parallel to your horizontal crease. Unfold the bottom corner; the crease you made will be used later.

IMG_7378

From the top, folded edge, fold the left side down to meet the center horizontal line (photo above). The top edge will now be vertical along the center line.

IMG_7379

The bottom edge now meets the line of the horizontal fold you made above and then unfolded.

IMG_7380

Do the same to the other side. Now you have a point at the top again.

IMG_7377

Fold the bottom corner up to the horizontal crease line.

IMG_7381

Now fold both sides in to meet the center vertical crease. This step looks like a sailboat. Do your best to keep the top point crisp.

IMG_7382

Open those sides out again.

IMG_7383

Now fold the left top side in again, allowing the corner to touch the horizontal crease you made in a previous step. Your top point is becoming more acute. Now do the same with the right side.

IMG_7384

Congratulations! You’ve make one point for your five-pointed star! Use tiny dabs of glue from your glue stick to tack down the parts that want to spring up. If you do this, your assembled star will look very precise hanging in the window and you’ll be able to see the beautiful pattern of lights and darks made by the folds of the paper.

Now repeat that folding process four more times, so that you have five of these points.

IMG_7385

To assemble your star I recommend that you make a guide on a large spare piece of paper using a ruler and a protractor. Your five points need to connect at 72-degree angles. Draw nice long lines on your guide so that you can align your point and the center along the lines. My guide has lines for 10-pointed stars, so I skip one when assembling a five-pointed star.

IMG_7386

Start with the top point. Place it’s bottom center on the intersection point of all the lines on your guide. Align the center crease along the line. Now hold it firmly in place and add the next point so that its left side overlaps the first point. Align the second point’s bottom center on the intersection point and the center crease along the guide’s line. Place a dab or two of glue so that the two will stick together. Add the third point to overlap the second. Before you glue the third point, ensure that all three points are still lining up with your guide lines. Continue with the fourth and fifth points, but glue only the left side of the final point.

IMG_7387

Finally, lift the top point up so that the right side of the fifth point goes underneath it, and then glue.

IMG_7388

Voilà! Now hang your star in the window!

IMG_7389

They’re pretty all together in their red-white-and-blue glory, aren’t they? I love them!  I’m thinking of making another style of window star for Fourth of July. I’ll try to do a tutorial for it, too, if I can find the time.

Tutorial: Make an Herbal Dream Pillow for St. John’s Day

herbal pillow

This article is excerpted from our Midsummer Festival E-Book.

Herbs harvested at Midsummer and during the Feast of Saint John (June 24, 2013) are said to be especially magical. Certain herbs, such as mugwort, laurel, sage, or marigold petals, are believed to give prophetic dreams if placed under a pillow at night! Will it work, do you think? Wouldn’t it be fun to find out?

It’s best to use dried herbs for your dream pillow. You’ll need two squares of muslin, two squares of yellow cotton fabric (about 5” by 5”), sewing machine, needle and thread, dried herbs, and a hot iron.

Cut your muslin squares to be about ½ inch smaller than your yellow squares. Sew around the muslin squares, leaving a 2 inch gap. Cut the corners off, but don’t cut into the stitching (this makes the pillow easier to turn inside out). Now turn your pillow inside out and iron it flat. Spoon in your dried herbs. Use a needle and thread to stitch up the hole. Now make the yellow pillow case. Put your “right” or pretty sides together. Sew around the three sides and the corners of the fourth side using a ¼ inch seam. Cut off the inside-out corners as before. Turn the pillow right side out. Use a pencil to make the corners look nice. Iron the yellow pillow case flat. Insert the inner muslin pillow into the yellow case. Turn in ¼ inch seam at the opening and iron it. Now sew up the fourth side, using a top stitch.

Now place your herbal dream pillow under your head before bedtime. Perhaps you’ll dream of the future! Or perhaps you’ll have amazing, fanciful dream that you can write down in a dream journal or draw a picture of in the morning.

Midsummer Festival E-Book

For more fun midsummer crafts, herb lore, Waldorf verses, handwork, and ways to celebrate Midsummer and St. John’s Day, please check out the Midsummer Festival E-Book by yours truly, Sara Wilson of Love in the Suburbs, and the fabulously talented Eileen Straiton of Little Acorn Learning. Click the link or the cover photo above to go directly to the page to find out more.

Wood-burned Garden Markers Tutorial

IMAG2978

Are you poring over seed and flower catalogs, itching to get your fingers dirty by planting your garden? Are you still stuck inside, or unable to plant because of cold temperatures? Here’s a little project to help you while away the time until you can get out there and start growing: Make wood-burned garden markers. We made these as a Christmas gift for grandparents and they were a hit. They are simple, inexpensive, and sweet.

Materials

  • wide craft sticks (tongue depressor size)
  • wood sun shapes
  • wood glue
  • watercolor paints or craft acrylics
  • wood-burner tool and tip
  • wood varnish

IMAG2949

Tutorial

These materials can all be found at a craft store such as Michael’s. We liked the sun shapes; we thought garden markers with sun shapes would be most appropriate for making garden plants grow big and strong and bountiful.

Start by deciding what plants you want markers for. Summer veggies or herbs are great. Practice drawing the fruits on paper a time or two, so you know how you want your wood-burned markers to look. Keep your drawings very simple because the wood-burner tool is more difficult to draw with than a pencil. We decided it was OK to abbreviate some of the longer vegetable names.

IMAG2950

My 10-year-old son did a couple of these, so I know a careful, older child can successfully use a wood-burner. Just stay nearby and encourage safe habits. The wood-burner gets very hot! (Be sure to protect your work surface, especially if it’s wood!) While using a wood-burner, you have to draw slowly, allowing the tool to make a mark on your pale wood. Be patient and go slow.

We decided that the marker stakes should also have words of inspiration for gardeners. We wrote “trust,” “patience,” “hope,” “peace,” and “love.” These are some of the qualities people need to make a garden grow, of course. Other virtues might be “caring,” “tenderness,” “gratitude,” “faith,” “prosperity,” “sufficiency,” “serenity,” and “tenacity.” Or maybe “sweetness,” “juiciness,” or “plenty.”

Glue your sun shapes to the craft sticks. Now you can choose to paint them with your watercolors or other paint, or you can leave them plain. We wanted ours to be colorful. If you’re using watercolors, be careful and put only a little moisture in your paint to color the vegetables. Too much water can make it run (like on our tomatoes). After you paint your veggies, paint the rest of the sun gold.

When all parts of your garden markers are dry, give them a good coat of varnish. This will protect the wood a bit from the elements. Now you just need to plant!


Snowflake Fairies Tutorial

Snowflake Fairy with Face

In between chilly outings, when we’re inside warming up, is a wonderful time to appreciate the beauty of winter. Paper snowflakes are festive and look lovely decorating windows and our family cuts beautiful snowflakes every year.  Here is a project for making lovely snowflake fairies to flutter and dance in the air. Hang them over a heating vent to see them blow about, just like a real, falling snowflake.

Note: Some Waldorf educators recommend that you not make needle-felted figures and animals in the presence of young children, who may find the action of repeatedly needling the woolen bodies to shape them somewhat disturbing.

Materials

Materials

  • coffee filter
  • chenille stems
  • needle and thread
  • scissors
  • wool batting
  • needle-felting needle and pad

IMG_9664 IMG_9665

Start by forming the skeleton of your fairy. Cut your chenille stem in half. Twist a loop into the center of one half; this is your fairy’s head with arms attached. Fold the other half over (body and legs). Then put one leg of the folded chenille stem through the loop. The two pieces are now interlocked. About an inch farther down, where the pelvis of the figure would be, twist again to make two legs. You should now have a wire “stick figure” like you see in the right photo above. Fold the smallest possible bit of wire over at the end of each limb, to form tiny hands and feet and keep the cut wire from poking anyone.

IMG_9666

Take a small bit of wool roving, roll it into a ball, and insert it into the loop of the figure’s head. Then wrap a bit more roving around the head and begin to needle it in place into an attractive head shape.

IMG_9668

Using very small bits of wool, wrap around the figure’s body and arms. I find making a crisscross of wool that goes from shoulder to waist in both directions to be a good method. Needle this wool until it’s firm and stationary. The fairy’s arms may need more needling than the body to make them graceful and slender.

IMG_9677

Now add a bigger fluff of wool to create a woolen petticoat. You can either allow the fairy’s feet to show below the fluffy skirt, or make the skirt extend below the feet.

Cut

Fold a white, circular coffee filter into quarters or eighths and cut a snowflake. Cut a very small tip off the snowflake and unfold it.

Snowflake

This is the only tricky part: Gently guide your fairy’s head through the center hole in your snowflake. Go slowly to avoid tearing the paper. If the head won’t fit through the hole, refold the snowflake and cut the tip just a tiny bit more to widen the hole and fit the head through.

Snowflake Fairy in Progress

You have a choice now. You can either put the fairy’s arms through holes in your snowflake (if you have such holes) to make a dress (see above), or you can gently move one arm at a time up through the neck hole of the snowflake to make it a skirt instead of a dress. This part is not unlike carefully dressing a small child, except your fairy will wiggle less.

IMG_9680

Next, use another chenille stem and form a circle. Twist the two ends together to seal the circle. Then twist the circle into a figure eight. These are your fairy’s wings. Use a bit of wool to tack the wings onto the fairy’s back. Now give your fairy some white hair, and allow it to flow over the center of her back where the wings meet the back.

Snowflake Fairy with Belt

If you made a dress, you might wish to belt it with a ribbon, bit of string, or a braid of wool roving.

Snowflake Fairy with Up-do

Here is a fairy with a skirt. You can give your fairy a fancy hairdo, if you like, by coiling wool into a bun and needling it onto her head. You can also add a face using tiny bits of color needled in for eyes and a mouth (as seen in the top photo). The fairies are adorable either way.

Snowflake Fairies

Now, you can make more snowflake fairies and hang them near each other to dance in the air, or display them with other snowflakes.

 Snowy Garland wih Snowflake Fairies

Please vote for Love in the Suburbs at the Circle of Moms Top 25 Creative Moms blog list. You can vote once per 24 hours until Jan 30, and you can vote for more than one blog on the list! Thank you!

Drawing Animals with Children

Bears

Winter days can be long and dreary if you don’t find happy ways to pass the time together indoors. When weather is especially inclement, take the opportunity to sit down with your children and draw. Even if you don’t consider yourself to be artistic, your children will most likely be delighted to have you by their side, making art. The impulse to create is so very strong in children. As parents and caregivers, we can nurture their creative impulse by modeling creative behavior.

Materials

  • paper
  • block crayons and stick crayons
  • inspiration photos from books or Internet
  • a story about animals in wintertime, perhaps

Tutorial

Take a little time to play with the crayons. Experiment how you can make different kinds of strokes and lines. Block crayons are beautifully suited for shading, blending, and giving dimension to your pictures.

Donna Simmons, author of Drawing with your Four to Eleven Year Old, says “By pressing firmly or lightly, you can achieve both depth and movement in clouds or sea, for example. Wavering strokes of red, yellow and orange can bring fire to life. Direction of stroke can also emphasize muscling or roundness in animals, depth in caves, or distance of, say, mountains in the background.” Her book holds specific tips for drawing in Kindergarten through Fifth grade Waldorf curriculum.

Inspiration

Picture books or books with lots of inspiring photographs are always nice to have around. We found this fox photo online and drew using it as our example.

Lucas Drawing

Lucas's Fox in the Snow (Age 9)

My 9-year-old’s drawing of the fox in the snow

My Fox in the Snow

My drawing of the fox in the snow

Here are some general drawing tips for children:

  • Avoid outlining.
  • Aim to capture the mood or movement of your subject, not the superfine detail.
  • Young children need not worry about eyes, whiskers, nose, etc.
  • Try to find your subject’s major shapes: where are the circles, ovals, triangles, and rectangles? Use these instead of outlining to avoid adding too much detail too soon.
  • Block out where the figures will fit on the page to help make them large and bold. Some children resist using the whole page.
  • Finish your picture with a decorative border.

Lucas's Owl at Night (Age 9)

My son’s drawing of an owl at night

You may find that you need to lead by example. After story time, try drawing an animal in your story. Or while your child is having free time, try drawing beside him or her. Encourage your child if he or she chooses to draw with you. “I like to be with you like this.”

Avoid saying things that imply a judgment of the child’s work (“good drawing,” “sloppy drawing,” etc.). Instead try to find something that you can comment on that feels neutral. “I wonder if that fox has cold feet.” or “What a fluffy coat it has!” Nor should you say that your own drawing is “bad” or “didn’t turn out right.”

My Chipmunk Drawing

Practice and your own drawings will improve. We are all learning as we go.

Display drawings made by your child. A wooden “card stand” works well for displaying small drawings. A cork board works nicely for larger ones. Refrigerators are a good standby, too, for showcasing family art. And never underestimate the delight a child will feel if you should put his or her artwork in a real frame.

Borax Crystal Snowflakes

upload

It’s January, so that means snow, right? Well, it does mean snow in lots of places, but not here in Northern California. So, we usually make our own snowflakes to brighten what inevitably becomes a month of fog and rain and mud. These snowflakes are made with Borax laundry booster (sodium borate) to add an ice crystal texture and shine. It takes a few days to make these.

Materials

  • white paper or coffee filters
  • scissors
  • Borax laundry booster
  • plates
  • boiling water
  • needle and thread

Tutorial

Start by cutting out your snowflakes. I tend to love very lacy snowflakes, but for this project I suggest you leave some nice solid areas. My son Lucas theorized that small cuts were better for these, and he may be right.

January upload

Boil a little water on the stove. Pour it into a glass mixing bowl and then add Borax until it will no longer dissolve into the water. When you see some borax sitting as a sediment in your bowl, you know your solution is right.

Place each snowflake on a dinner plate. Pour a little of the Borax solution onto the plate—just enough to cover the whole snowflake. Now you wait.

upload

The Borax will start to crystallize on the paper and plate. As it dries, the water will become clearer. You can gently pour off the excess water to speed the drying process. Allow the snowflakes to dry completely, the very carefully pry them up off the plate with a butter knife.

IMG_3852

Some of the Borax may fall off, but most of it will stick to the paper. With your needle and thread, sew a few stitches at the top of your crystal snowflakes and then hang them in the window where they sun can glint off their crystals.

IMG_3857

Enjoy!

  • About Sara

    Thanks for visiting! I’m Sara, editor and writer, wife to Ian, and mother of two precious boys. I am living each day to the fullest and with as much grace, creativity, and patience as I can muster. This is where I write about living, loving, and engaging fully in family life and the world around me. I let my hair down here. I learn new skills here. I strive to be a better human being here. And I tell the truth.

    Our children attend Waldorf school and we are enriching our home and family life with plenty of Waldorf-inspired festivals, crafts, and stories.

    © 2003–2018 Please do not use my photographs or text without my permission.

    “Love doesn’t just sit there like a stone; it has to be made, like bread, remade all the time, made new.” —Ursula K. LeGuinn

  • Buy Our Festivals E-Books


  • Archives

  • Tags

  • Categories

  •  

  • Meta